Construct Training Data
Overview
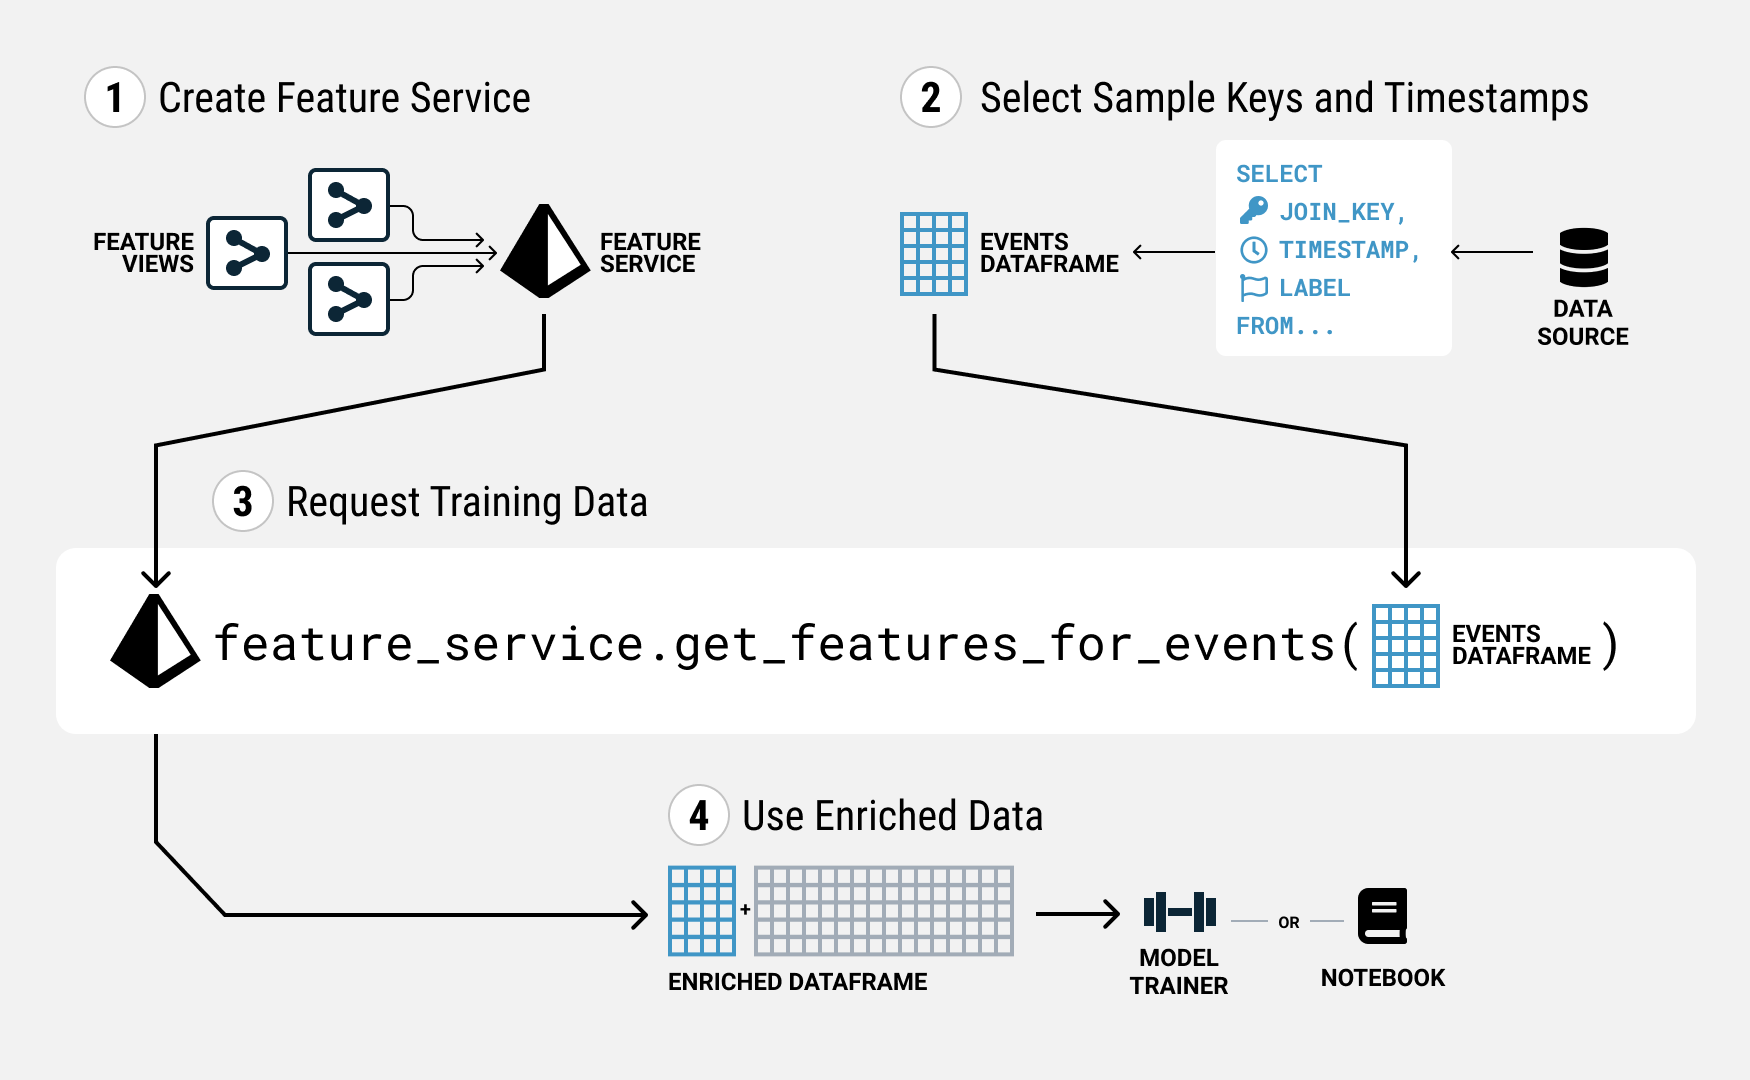
Tecton makes it easy to correctly create training data from your features. Constructing training data in Tecton involves three main steps:
- Creating the feature service that assembles the features you want, if you do not already have one.
- Selecting the keys and timestamps for each sample you want in your training data. We call these the training events.
- Requesting the training data from the Feature Service by giving it the DataFrame of training events.
Pre-requisites
- Feature Views – you need to have at least one Feature View, where the feature transformations you want are defined.
- Data Sources – you need to have at least one Data Source, from which your Feature Views will source data.
You can generate training data by querying a FeatureView instead of using a FeatureService:
- Only for a single FeatureView
- Must be offline
Otherwise, for multiple FeatureViews or for online data use a FeatureService.
A Note on Point-in-time Correctness
Tecton's training data generation API requires specifying a timestamp key for each sample. This timestamp is needed to produce what we call point-in-time correct feature values.
Why is this important? When training a model, data from before the prediction generation time is fair game, but data from after that moment should not be included. After all, at prediction time, you only have information from the past. Your models should be trained under this constraint as well. Failing to do so will lead to inflated offline performance metrics that the model will not achieve online.
Let's consider an ads click through rate use case.
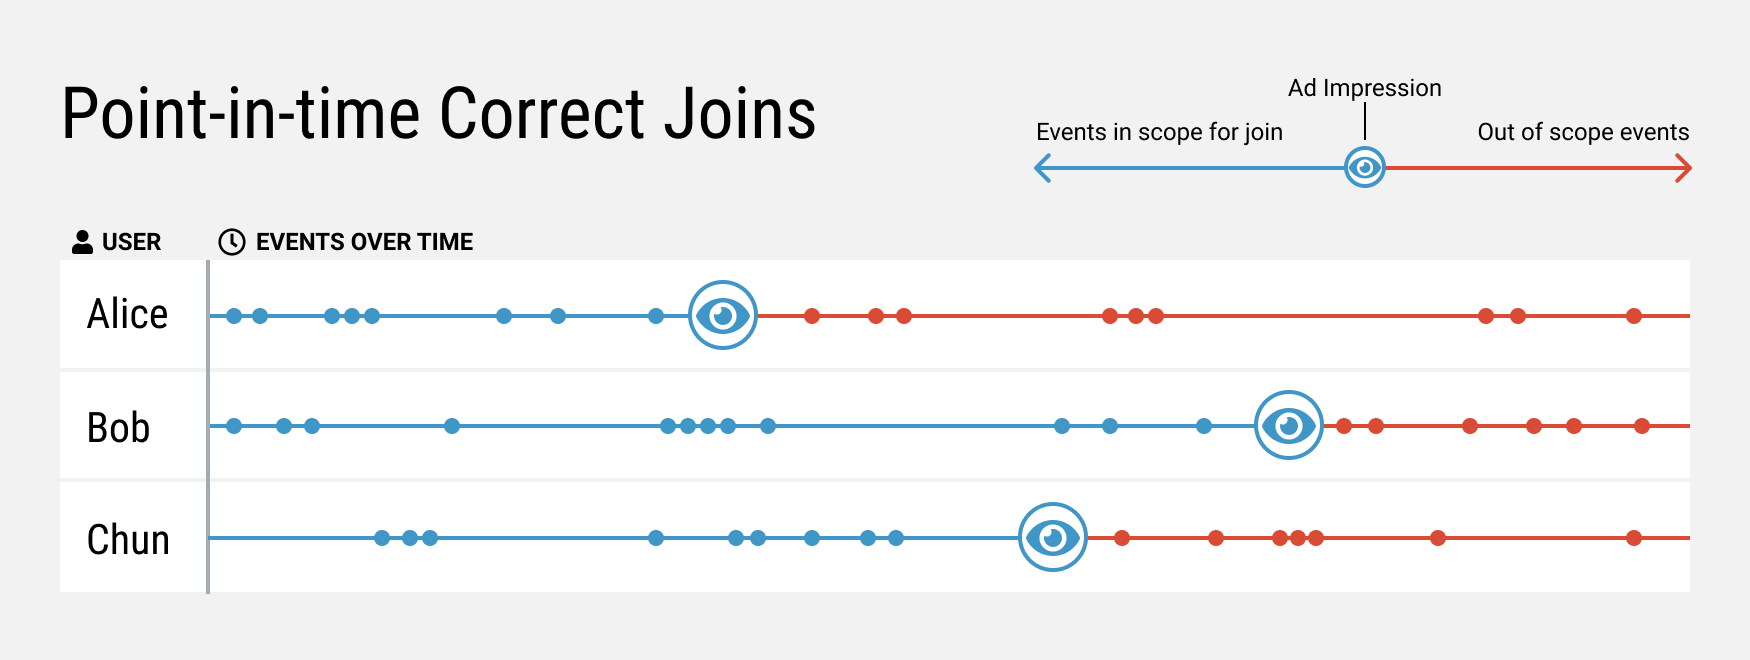
If you want to use the prediction to make a decision when you are about to show an ad, then the timestamp should be the ad impression time. Note that prediction generation timestamps are different per sample! This per-sample point-in-time correct feature value generation is fairly tricky to implement. Fortunately, this works out of the box with Tecton.
Different prediction scenarios will require a different choice for the timestamp, and the choice depends heavily on your modeling approach. We will discuss this further in section 2.2.
1. Creating a Feature Service
In Tecton, a Feature Service is used both to serve features to production models, and to create training datasets for model training. You can create a Feature Service by writing a definition file.
Let's imagine you have created a number of different Feature Views for this
modeling task. Pulling them together is as simple as importing them and listing
them under features in your Feature Service definition.
ad_ctr_feature_service = FeatureService(
    name="ad_ctr_feature_service",
    description="A Feature Service providing features for a model that predicts if a user will click an ad.",
    features=[
        user_ctr_7d,
        user_click_counts,
        user_impression_counts,
        user_ad_impression_counts,
        user_distinct_ad_count_7d,
    ],
)
For every Feature View you want to include, import them into your Feature
Service definition file, and list it under the features key. Once it is ready,
save it, and run tecton apply to create the Feature Service.
Next, let's generate a list of samples and timestamps which we will pass to the Feature Service.
2. Selecting sample keys and timestamps
Given a list of sample keys, and a timestamp for each key, Tecton's Feature Service will return all the feature values for that sample as they were at the time you specified. As we mentioned earlier, this key is critical for preventing future signals from leaking inappropriately into training data where they do not belong.
2.1 How do we get that timestamp?
Let's imagine we have two tables for our ads click through rate task:
- A time-series table of ad impression events
ad_impressions, with auser_id,ad_id, and atimestamp - A time-series table of ad click events
ad_clicks, again with auser_id,ad_id, and atimestamp
Using this data, we want to estimate the likelihood that a user will click a given ad in the 30 mins after it was shown.
In our DataFrame of training events, we need to have:
- The entity keys - i.e. the
user_idad_idpair - The timestamp – in this case, this should be the timestamp of the ad impression event
- Optionally, the label - in this case, this would be whether there was an ad
click event within 30 mins of the timestamp for the same
user_idad_idpair. In a training scenario, you'll need the label to train your model, however, this field is optional for retrieving features from Tecton.
Thus, a query to generate training events might look like this.
SELECT
    ad_impressions.user_id,
    ad_impressions.ad_id,
    ad_impressions.timestamp,
    (
        ad_clicks.timestamp IS NOT NULL AND
        (JULIANDAY(ad_clicks.timestamp) - JULIANDAY(ad_impressions.timestamp)) * 1440 < 30
    ) as label
FROM ad_impressions
LEFT JOIN ad_clicks
ON ad_impressions.user_id = ad_clicks.user_id AND ad_impressions.ad_id = ad_clicks.ad_id;
Which might generate a DataFrame of training events that looks like this:
| user_id | ad_id | timestamp | label |
| 1 | 1001 | 2021-05-28 10:00:00 | 1 |
| 1 | 1002 | 2021-05-28 10:10:00 | 0 |
| 2 | 1001 | 2021-05-28 10:23:00 | 1 |
Passing this to the Feature Service as a DataFrame, will enable you to leverage Tecton's point-in-time correct joins to full effect. We will discuss this more in section 3.
2.2 Choosing the Prediction Time Context
To choose the right timestamp, it is important to think through the time context in which your model will make a prediction. For example:
- In a credit card fraud use case, the prediction time context might be right before you would have charged the credit card. Activities post transaction shouldn't be used, since it would not have been available at the time the card is charged.
- In a matchmaking use case in a dating app, the prediction time context should be right before the recommendation was made. The matched users might exchange messages after, but that information would not have been there when the recommendations were made.
If you have an event that corresponds with the moment of prediction generation, that timestamp will work great. More generally, event tables in your data system are a good place to look for an appropriate timestamp. If you do not have event records at the right granularity, you may have to find a proxy or do some rearchitecting to take advantage of point-in-time correct joins.
Ultimately, the correct training event generation query is dependent on your framing of the modeling problem. A different problem framing will require a different set of queries and joins.
2.3 How Tecton uses the Timestamp
Under the hood, Tecton is tracking feature values and how they change over time. When given a timestamp in the training data generation request, Tecton performs a lookup for each individual key and reconstructs the feature values as they would have been at the requested time.
To generate training data, Tecton uses an AS OF join (also known as a
point-in-time join) to join training event timestamp with the
_effective_timestamp (calculated internally) of the features.
An AS OF join is a join of two tables using the timestamp column in each table.
For a given record r in the first table, the record in the second table that
has both the closest timestamp to r and is less than or equal to r's
timestamp is returned.
The _effective_timestamp is the earliest time the feature will be available in
the online store for inference. The _effective_timestamp is always greater or
equal to the feature timestamp. The sections below explain how the
_effective_timestamp is calculated.
How the _effective_timestamp is calculated for Batch Feature Views
For Batch Feature Views, the _effective_timestamp of a feature is calculated
by adding the start time of the materialization job (according to the
batch_schedule) to data_delay (the amount of time to wait before the job
starts).
How the _effective_timestamp is calculated for Stream Feature Views
For Stream Feature Views with built-in time-window aggregations, the
_effective_timestamp is calculated as follows:
-
When the
stream_processing_modeparameter is set toStreamProcessingMode.TIME_INTERVAL, the_effective_timestampis the end of the lastaggregation_interval. -
When the
stream_processing_modeparameter is set toStreamProcessingMode.CONTINUOUS, the_effective_timestampis the feature timestamp.
For Stream Feature Views without built-in time-window aggregations, the
_effective_timestamp is the feature timestamp.
How to see the _effective_timestamp
The _effective_timestamp column is automatically added to all feature records
returned by calls to get_features_for_events() which do not include a
DataFrame of training events.
3. Requesting Training Data
You can generate your training data using the Feature Service you defined above
by passing the events as a DataFrame to the Feature Service using the
get_features_for_events method.
# Create a sample DataFrame with user_id, ad_id, timestamp, and label columns
import pandas as pd
from datetime import datetime

events = pd.DataFrame(
    {
        "user_id": [1, 1, 2],
        "ad_id": [1001, 1002, 1001],
        "timestamp": [
            datetime(2021, 5, 28, 10, 0, 0),
            datetime(2021, 5, 28, 10, 10, 0),
            datetime(2021, 5, 28, 10, 23, 0),
        ],
        "label": [1, 0, 1],
    }
)

ws = tecton.get_workspace("prod")
fs = ws.get_feature_service("ad_ctr_prediction_service")
training_data = fs.get_features_for_events(events, timestamp_key="timestamp", from_source=True)
training_data contains the join keys, timestamps, and values for all the
features in the Feature Service, and any other columns that were in events.
Tecton then joins all of the relevant feature values for each row in events,
and passes that back to you so that you can train your models.
If you would like to save this dataset for reuse later, or to share it with your
team, just set the save parameter to True in the get_features_for_events()
call.
training_data = fs.get_features_for_events(events, timestamp_key="timestamp", save=True)
Changing the Compute Engine for Offline Retrieval
Tecton selects a default compute engine for offline retrieval based on the environment with which you're using Tecton. For example, calling an Offline Retrieval Method while using Tecton on Spark will, by default, leverage the local Spark context to compute historical feature data.
Tecton also supports local, Python-only feature retrieval. With this capability, Tecton uses a query engine included within the SDK to construct and execute a point-in-time correct query without any external dependencies (e.g. a Spark context).
This is the default behavior for offline retrieval when using Rift.
To explicitly set this behavior for offline retrieval (e.g. when using Spark),
set the compute_mode parameter as follows:
# When calling get_features_for_events
training_data = fs.get_features_for_events(events, timestamp_key="timestamp", from_source=True, compute_mode="rift")
Alternatively, you can globally configure this behavior within your Python
environment using
tecton.conf.set("TECTON_OFFLINE_RETRIEVAL_COMPUTE_MODE", "rift").
Note: When using Python-only feature retrieval:
- The
riftextra should be installed along with the latest Tecton beta SDK (pip install 'tecton~=0.9.0b0' [--upgrade]) - Your Python environment should have read access to the
offline_store/path of the Tecton S3 bucket (e.g. by setting theAWS_ACCESS_KEY_IDandAWS_SECRET_ACCESS_KEYenvironment variables) - Spark- or Snowflake-based features
cannot be retrieved using
from_source=Trueand should be materialized to the offline store
Offline Feature Retrieval and Training Data Generation
When retrieving materialized Feature Views from the offline store, both Spark
and Rift can technically retrieve any Feature View. Tecton defaults to Rift.
Users can overwrite this by setting TECTON_OFFLINE_RETRIEVAL_COMPUTE_MODE
locally.
When generating data from un-materialized Batch or Stream Feature Views, you can only use the compute engine that matches the transformation type of the Feature View.
The features being retrieved must be materialized offline or match the specified compute mode.
To execute offline queries with Rift, set the compute_mode='rift' parameter in
your Offline Retrieval call.
To execute offline queries with Spark, set the compute_mode='spark' parameter
in your Offline Retrieval call.