Data Source Filtering and select_range()
Filtering Batch Data Sources
Data filtering is an essential technique in feature engineering, as it optimizes
data access, improves performance, and ensures that only relevant data is
processed. Raw data filtering is used both during materialization (when raw data
is transformed into feature values) and offline retrieval with
from_source=True (when historical feature values are accessed for analysis or
model training).
Why Filter at the Raw Data Source Level?
Filtering data at the source ensures that only the necessary data is processed, reducing computational overhead and improving the efficiency of your feature engineering pipeline. By applying a time filter, you can limit the data to only what's relevant for the task at hand, which is critical when working with large datasets or time-sensitive features.
How Filtering Works for Materialization
During materialization, data is transformed into feature values for a specific
job time interval. Without data source filtering, each job would read the full
raw data source and then filter the transformed data according to the Feature
Timestamp (timestamp_field). This often meant that the job read more data than
what was necessary to produce features for the job's materialization interval.
Filtering at the Raw Data level ensures that only data within this time range is
processed. Starting Tecton 1.0, filtering the raw data source according to the
materialization time range is the default behavior for Batch Sources (or sources
with a batch_config) when a source is added to a Feature View using the
sources config.
@batch_feature_view(
    sources = [my_transactions_source]
)
- Example: For a materialization job running from March 1 to March 5, the filter will limit the raw data read to this time range, improving performance by avoiding unnecessary data processing.
To read the entire Data Source for each job, use
@batch_feature_view(
    sources = [my_transactions_source.unfiltered()]
)
How Filtering Works for Offline Retrieval
During Offline Retrieval queries with from_source=True, Tecton ensures that
only data within the relevant time window is accessed, based on either specific
timestamps from a events DataFrame in the case of
get_features_for_events(events) or a user-defined time range in the case of
get_features_in_range(start, end).
The select_range() Method
In case you need to alter the default filtering behavior, the select_range()
method introduced in Tecton 1.0 provides a powerful and flexible way to filter
data according to custom time ranges. This method allows you to precisely define
the start and end times for filtering, making it adaptable to a wide variety of
use cases.
How to Use select_range()
The select_range() method can be configured with:
- Tecton Time Constants: These are constants that represent key time anchors:
| Time Anchor | Description |
|---|---|
MATERIALIZATION_START_TIME | The Start Time of the Materialization Job. |
MATERIALIZATION_END_TIME | The End Time of the Materializaiton Job. |
UNBOUNDED_PAST | Represents a time point that extends infinitely into the past. This can be used to capture all data without a lower time bound. |
UNBOUNDED_FUTURE | Represents a time point that extends infinitely into the future. It is useful for capturing all data without an upper time bound. |
- Datetime Objects: For static time ranges, you can use specific
datetimevalues. - Timedelta Modifiers: Adjust time anchors using offsets (e.g., subtracting days or hours) for more flexible filtering.
Examples of select_range() Configurations
Let's take an example of a Batch Feature View that is materializing data with a
batch_schedule of 1 day.
Here are several ways to configure the select_range() method. We will inspect
the behavior of the Data Source Filtering for the 3 jobs that are materializing
data from Day 1 to Day 4.
-
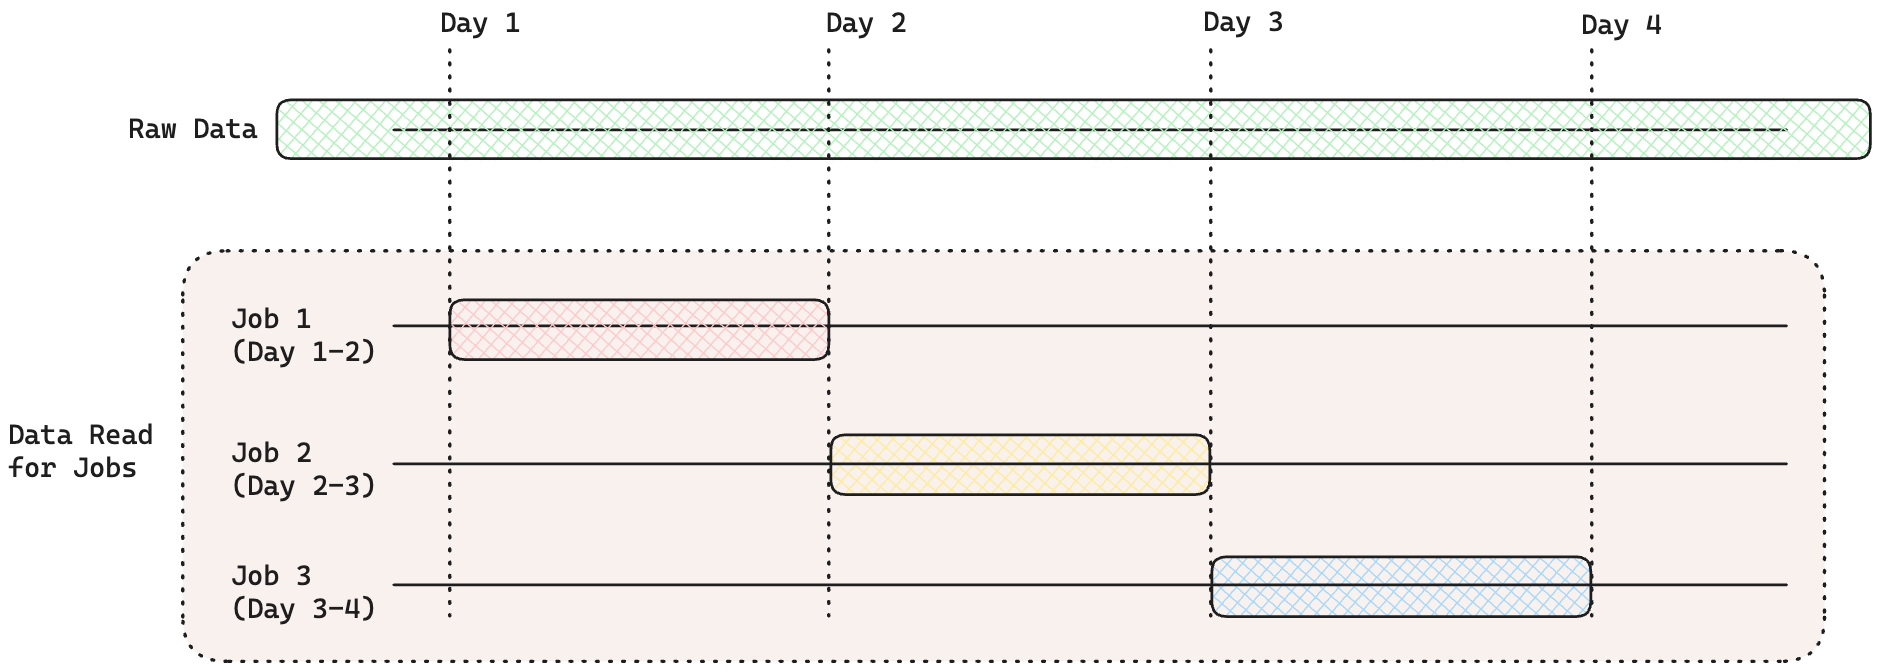
Default Materialization Interval (Filtered by Job Time Range):
@batch_feature_view(
  sources = [transaction_ds]
)

# which is equivalent to (since it's the default behavior)
@batch_feature_view(
  sources = [
      transaction_ds.select_range(
          start_time=TectonTimeConstant.MATERIALIZATION_START_TIME,
          end_time=TectonTimeConstant.MATERIALIZATION_END_TIME,
      )
  ]
)
Each Job will read data according to the time period of the Materialization Job. i.e. The job materializing data for Day 1-2 will filter the raw data for Day 1-2

-
Unfiltered Data:
@batch_feature_view(
  sources = [transaction_ds.unfiltered()]
)

# which is equivalent to
@batch_feature_view(
  sources = [
      transaction_ds.select_range(
          start_time=TectonTimeConstant.UNBOUNDED_PAST,
          end_time=TectonTimeConstant.UNBOUNDED_FUTURE,
      )
  ]
)
Every job will read all the source data without any filtering. This is useful if you need every job to have access to all historic events for your feature transformation.

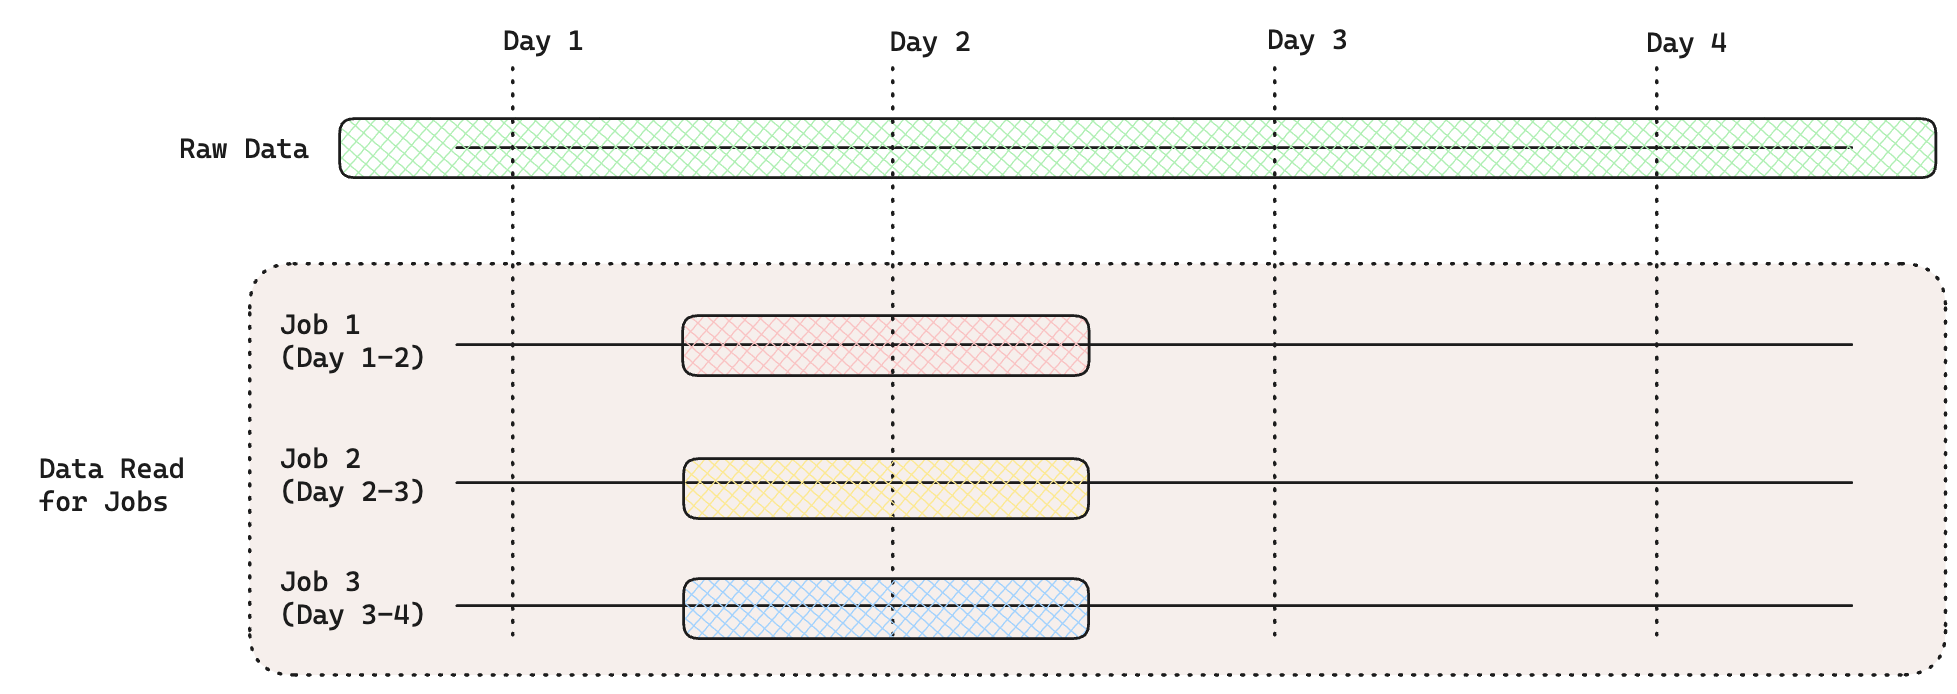
- Custom Date Range:
Every job will read only the data between 12pm on Day 1 and 12pm on Day 2.
@batch_feature_view(
  sources = [
      transaction_ds.select_range(
          start_time=datetime(<Day 1 12pm>),
          end_time=datetime(<Day 2 12pm>),
      )
  ]
)

- Unbounded Past and Future:
@batch_feature_view(
  sources = [
      # Data from the start of the dataset until materialization end time
      transaction_ds.select_range(
          start_time=TectonTimeConstant.UNBOUNDED_PAST,
          end_time=TectonTimeConstant.MATERIALIZATION_END_TIME,
      )
  ]
)
The UNBOUNDED_PAST constant can be used to read from the start of the raw
data. The UNBOUNDED_FUTURE constant can be used to read all future data from a
fixed point. The above example reads data from the start of the raw data until
the end of the Materialization Time interval.

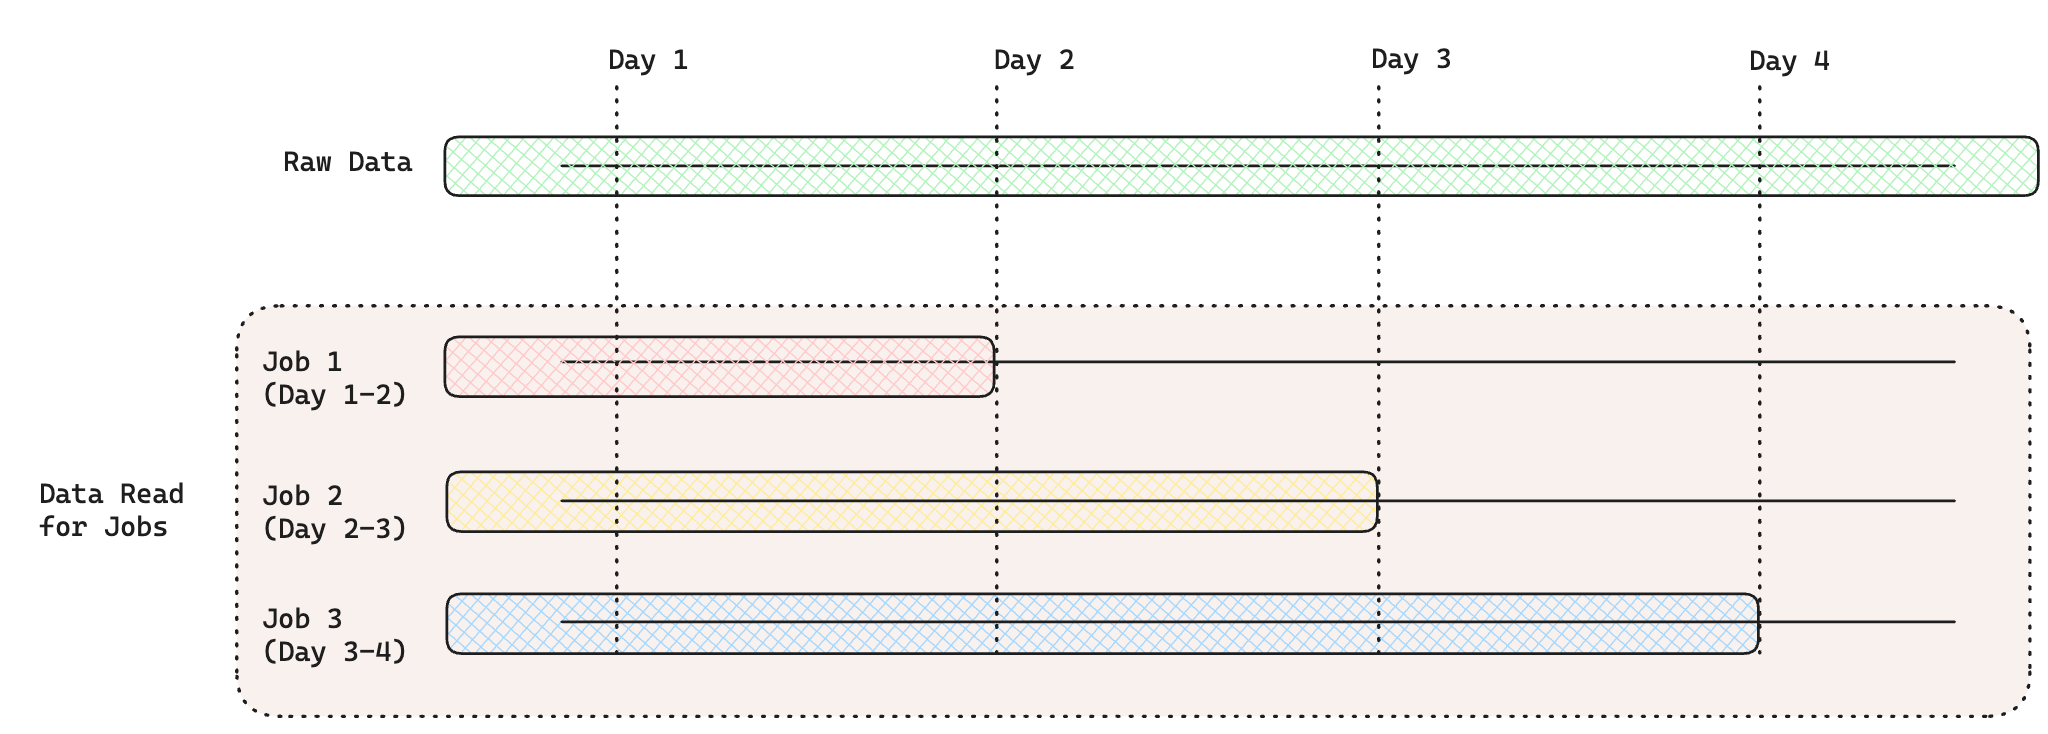
- Fixed Time Offsets:
@batch_feature_view(
  sources = [
      # 2 day window from Job Start Time - 1 day to Job End Time (batch_schedule = 1 day)
      transaction_ds.select_range(
          start_time=TectonTimeConstant.MATERIALIZATION_START_TIME - timedelta(days=1),
          end_time=TectonTimeConstant.MATERIALIZATION_END_TIME,
      )
  ]
)
Behavior of Filtered Sources during Offline Retrieval
In offline retrieval (get_features_for_events or get_features_in_range) with
from_source=True, filtering is based on the events or date range provided by
the user
- For
get_features_for_events(events), the specific timestamps from the events which represents the events for which features are needed - For
get_features_in_range(start, end), thestartandendarguments will determine the time range filter applied on the raw data source.
Example: Retrieving Features for a Specific Event
Here’s an example where we retrieve feature values for a specific event, using
the events dataframe that contains a timestamp and user ID. The filtering will
be based on the timestamps in the events dataframe, ensuring that only data
around those events is retrieved.
events = pandas.DataFrame.from_dict(
    {
        "timestamp": [
            pandas.Timestamp("2024-01-01T01:00:00Z"),
            pandas.Timestamp("2024-03-01T01:00:00Z"),
        ],
        "user_id": ["user_1"],
    }
)

df = fv.get_features_for_events(events, from_source=False).to_pandas()
In this example:
- The
eventsdataframe contains the timestamps (2024-01-01T01:00:00Zand2024-03-01T01:00:00Z) and theuser_idfor which we want to retrieve features. - The
get_features_for_events()method uses this dataframe and applies time-based filtering to ensure only the relevant data to generate features for the given timestamps is accessed. This reduces the amount of data read from the source and ensures that the feature values returned are relevant to the specified event.
Example: Retrieving Features in a Time Range
If you want to retrieve features over a broader time range, you can specify a
custom range using get_features_in_range(start, end):
df = fv.get_features_in_range(
    start=datetime(2023, 2, 1),
    end=datetime(2023, 3, 1)
).to_pandas()
In this case the filter retrieves all feature values between February 1 and March 1, based on the configured range.