Configure EMR
The following steps configure the connection between a Tecton Account and the Customer Data Plane AWS and EMR resources. See the Virtual Private Tecton Architecture overview for more information on the Customer Control Plane.
If your organization uses Terraform to manage AWS resources, we recommend you leverage this sample terraform setup repository in place of manually entering these values. The instructions below may still be a valuable reference when adapting the template to your needs, especially the networking section. Once you've applied the configuration to your account, please see the request your installation step.
If you have already connected your Tecton Account to your Cloud Provider, then you only need to configure the Spark and EMR roles below.
Create a Tecton S3 Bucket
Tecton will use a single S3 bucket to store all of your offline materialized feature data.
To configure the S3 bucket:
-
Create an S3 bucket called
tecton-[DEPLOYMENT_NAME](e.g.tecton-mycompany-production). -
Ensure the bucket's region is the same as the region in which you'd like to deploy Tecton (e.g.
us-west-2). -
Enable default encryption using the Amazon S3 key (SSE-S3).
-
(Optional step if you want to enable Rift) Add a Policy to the S3 bucket
tecton-{DEPLOYMENT_NAME}to allow Tecton to read/write to it.-
Navigate to S3 ->
tecton-{DEPLOYMENT_NAME}S3 Bucket -> Permissions. There, add the following policy, replacing{TECTON_CONTROL_PLANE_ARN}with the ARN of the Tecton Control Plane account. Ask your Tecton Account Manager if you do not have this ARN.{
"Version": "2012-10-17",
"Statement": [
{
"Sid": "TectonS3",
"Effect": "Allow",
"Principal": {
"AWS": "{TECTON_CONTROL_PLANE_ARN}"
},
"Action": ["s3:GetObject", "s3:PutObject", "s3:DeleteObject"],
"Resource": "arn:aws:s3:::tecton-{DEPLOYMENT_NAME}/*"
},
{
"Sid": "TectonS3List",
"Effect": "Allow",
"Principal": {
"AWS": "{TECTON_CONTROL_PLANE_ARN}"
},
"Action": "s3:ListBucket",
"Resource": "arn:aws:s3:::tecton-{DEPLOYMENT_NAME}"
}
]
} -
Make sure the Object Ownership Setting for the
tecton-{DEPLOYMENT_NAME}S3 Bucket is set to ACLs Disabled (Bucket Owner Enforced). This allows the AWS account with the S3 bucket to automatically own and have full control over objects written by Rift.- In the AWS console open the S3 bucket configuration for the
tecton-${DEPLOYMENT_NAME}bucket - Navigate to the permissions tab (if not already there)
- Under the Edit Object Ownership section, click the Edit button
- Select ACLs disabled (recommended)
- This should change Object Ownership to Bucket owner enforced
- Click Save Changes
- In the AWS console open the S3 bucket configuration for the
-
Configure IAM roles
In this section we'll configure the roles and policies required for Tecton to manage S3, Dynamo, and Spark resources. After completing this section, you should have:
-
A Spark role (
tecton-{DEPLOYMENT_NAME}-spark-role) with the following policiestecton-{DEPLOYMENT_NAME}-spark-policytecton-spark-scoped-secrets-policy- AmazonSSMManagedInstanceCore policy
-
An EMR Manager(
tecton-{DEPLOYMENT_NAME}-emr-manager-role) role with the following policiestecton-{DEPLOYMENT_NAME}-spark-policytecton-emr-manager-policy
-
A cross-account role (
tecton-{DEPLOYMENT_NAME}-cross-account-role) with the following policiestecton-cross-account-spark-policytecton-{DEPLOYMENT_NAME}-cross-account-policy
Configure the EMR Manager and Spark Roles
-
In the AWS Console of the account you want to deploy Tecton into, go to the IAM service.
-
Click the Policies tab in the sidebar.
-
Create the Tecton Spark Policy
-
Click Create Policy.
-
Paste in the following JSON policy, replacing
${REGION}with the AWS region you selected for your deployment,${ACCOUNT_ID}with the account ID of your Tecton Data Plane account, and${DEPLOYMENT_NAME}with your Tecton deployment nametemplates/spark_policy.jsonloading... -
Click Next: Tags
-
Click Next: Review
-
Give the policy an easy to remember name starting with
tecton-, liketecton-{DEPLOYMENT_NAME}-spark-policy
-
-
Create the Tecton EMR Manager policy
-
Click Create Policy.
-
Paste in the following JSON policy, replacing
${SPARK_ROLE}with the name you plan to use for the role (such astecton-{DEPLOYMENT_NAME}-spark-role), and${DEPLOYMENT_NAME}with your Tecton deployment nametemplates/emr_master_policy.jsonloading... -
Click Next: Tags
-
Click Next: Review
-
Give the policy an easy to remember name starting with
tecton-, liketecton-emr-manager-policy -
Click Create Policy
-
-
Create the Tecton Spark Scoped Secrets policy
-
Click Create Policy.
-
Paste in the following JSON policy, replacing
${ACCOUNT_ID}with the account ID of your AWS account, and${DEPLOYMENT_NAME}with your Tecton deployment nametemplates/emr_spark_policy.jsonloading... -
Click Next: Tags
-
Click Next: Review
-
Give the policy an easy to remember name starting with
tecton-, liketecton-spark-scoped-secrets-policy -
Click Create Policy
-
-
Click the Roles tab in the sidebar.
-
Create the Spark Role
-
Click Create role.
-
Select EC2 under Common Use Cases
-
Click the Next: Permissions button
-
Attach the Tecton Spark Policy by searching for the policy you created earlier, such as
tecton-spark-policy, and click the check box next to that policy to attach the policy to the new role. -
Attach the Tecton Spark Scoped Secrets Policy by searching for the policy you created earlier, such as
tecton-spark-scoped-secrets-policy, and click the check box next to that policy to attach the policy to the new role. -
Attach the AmazonSSMManagedInstanceCore policy by searching for the AmazonSSMManagedInstanceCore policy, and click the check box next to the policy to attach the policy to the new role.
-
Click the Next: Tags button.
-
Click the Next: Review button.
-
In the Role name field, enter a role name starting with
tecton-, such astecton-{DEPLOYMENT_NAME}-spark-role. -
Click Create role. You will see a list of roles displayed.
-
Ensure that the role has an Instance Profile associated with it, and that the Instance Profile has the same name as the role. If you created this role through the console, the Instance Profile should have been created automatically.
-
Ensure that the role has "AWS Service: ec2" in its "Trusted Entities". If you created this role through the console, this should have been added automatically.
-
-
Create the EMR Manager role
-
Click Create role.
-
Select EMR under Use Cases
-
At the bottom of the page, select the default EMR role.
-
Click the Next: Permissions button
-
Search for the Tecton Spark policy you created earlier, such as
tecton-spark-policy, and click the check box next to that policy to attach the policy to the new role. -
Search for the Tecton EMR Manager policy you created earlier, such as
tecton-emr-manager-policy, and click the check box next to that policy to attach the policy to the new role. -
Click the Next: Tags button.
-
Click the Next: Review button.
-
In the Role name field, enter a role name starting with
tecton-, such astecton-{DEPLOYMENT_NAME}-emr-manager-role. -
Click Create role. You will see a list of roles displayed.
-
Ensure that the role has "AWS Service: elasticmapreduce" in its "Trusted Entities". If you created this role through the console, this should have been added automatically.
-
Configure the cross-account role for the Tecton Control Plane
-
In the AWS Console of the account you want to deploy Tecton into, go to the IAM service.
-
Click the Policies tab in the sidebar.
-
Create the cross-account Spark policy
-
Click Create Policy.
-
Paste in the following JSON policy, replacing
${SPARK_ROLE}with the same role name you used previously (such astecton-{DEPLOYMENT_NAME}-spark-role),${EMR_MANAGER_ROLE}with the name you plan to use for the role (such astecton-{DEPLOYMENT_NAME}-emr-manager-role),${REGION}with the AWS region you selected for your deployment,${ACCOUNT_ID}with the account ID of your Tecton Data Plane account, and${DEPLOYMENT_NAME}with your Tecton deployment nametemplates/emr_ca_policy.jsonloading... -
Click Next: Tags
-
Click Next: Review
-
Give the policy an easy to remember name, like
tecton-cross-account-spark-policy -
Click Create Policy
-
-
Create the cross-account policy
-
Click Create Policy.
-
Paste in the following JSON policy, replacing
${REGION}with the AWS region you selected for your deployment,${ACCOUNT}with the account ID of your AWS account,${DEPLOYMENT_NAME}with your Tecton deployment name, and${SPARK_ROLE}with the name of your spark role, such astecton-{DEPLOYMENT_NAME}-spark-role.templates/ca_policy.jsonloading... -
Click Next: Tags
-
Click Next: Review
-
Give the policy an easy to remember name starting with
tecton-, liketecton-{DEPLOYMENT_NAME}-cross-account-policy -
Click Create Policy
-
-
Create the cross-account role
-
Click the Roles tab in the sidebar.
-
Click Create role.
-
Under Select type of trusted entity, click the Another AWS account tile.
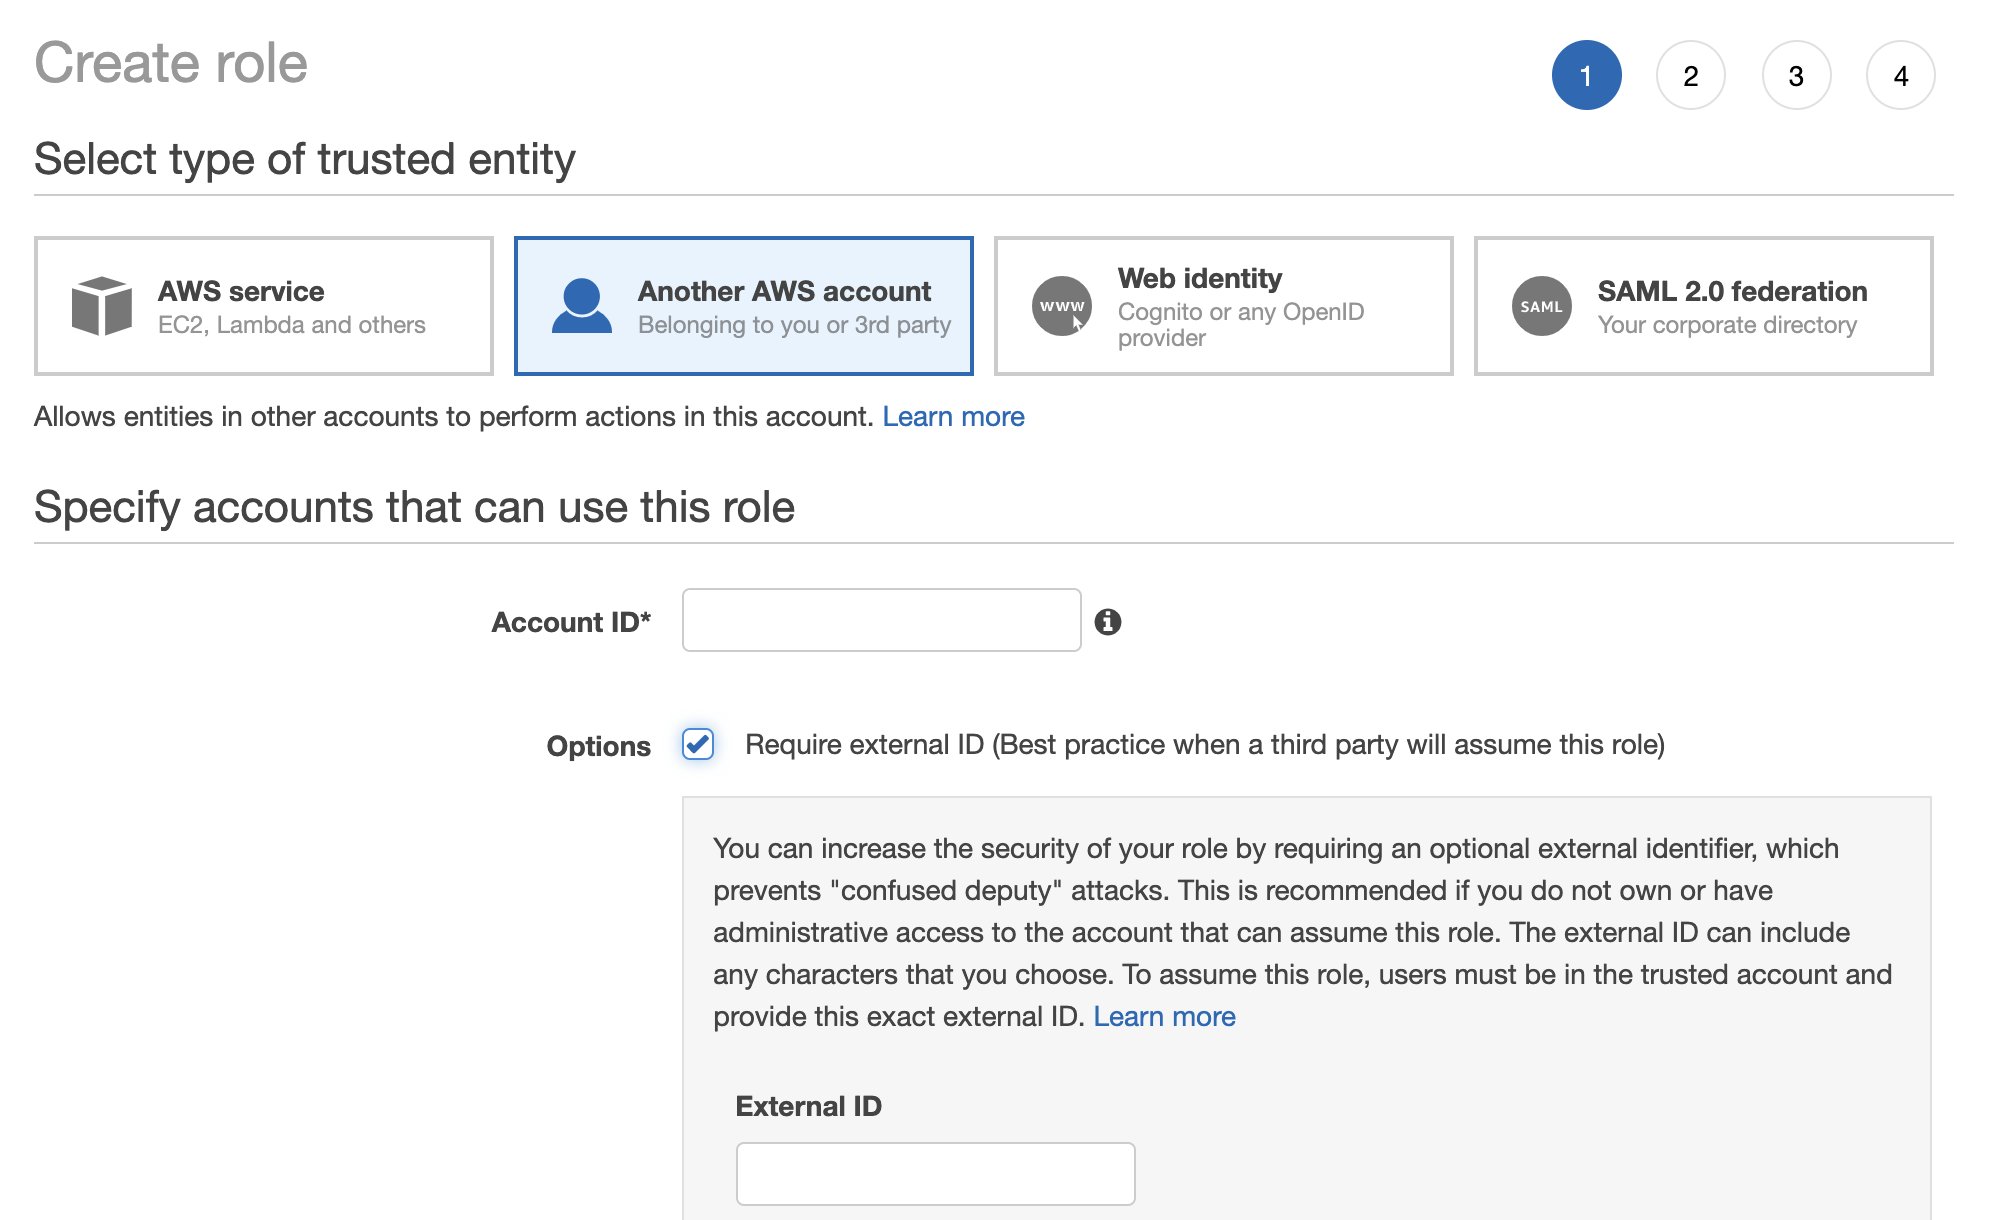
-
Specify the Tecton Account ID. Please contact your account executive obtain the correct account ID for you.
-
Enable the option "Require external ID."
-
Enter a random External ID of your choice (for example, a UUID works well). Make sure to note down the external ID that you choose -- you'll need to provide this to Tecton to complete the installation.
-
Click the Next: Permissions button
-
Search for the policy you created (e.g.
tecton-{DEPLOYMENT_NAME}-cross-account-policy), and click the check box next to that policy to attach the policy to the new role. -
Search for the cross-account Spark policy you created (e.g.
tecton-cross-account-spark-policy), and click the check box next to that policy to attach the policy to the new role. -
Click the Next: Tags button.
-
Click the Next: Review button.
-
In the Role name field, enter a role name starting with
tecton-, such astecton-{DEPLOYMENT_NAME}-cross-account-role. -
Click Create role. You will see a list of roles displayed.
-
Configure networking
Tecton will need a VPC and subnets to use when creating EMR clusters -- these
can be existing resources or you can create them for Tecton. Either way, make
sure to tag the resources with the tecton-accessible:DEPLOYMENT_NAME tag.
Configure the VPC and subnet
- Add the following tag to the VPC:
key: tecton-accessible:DEPLOYMENT_NAME
value: true
- You'll need a private subnet in each of the availability zones you intend for
Tecton to use (at least 2 AZs)
- Ensure the route table for each of the subnets allows internet access on 0.0.0.0/0. You can accomplish this using NAT Gateways.
- Add the follow tag to each subnet:
key: tecton-accessible:DEPLOYMENT_NAME
value: true
Configure security groups
You'll need to set up two security groups that allow the EMR clusters that Tecton creates to:
- Communicate internally
- Connect to other AWS resources
- Externally pull configuration
- Install Python packages
- Push metrics for monitoring and alerts
To do so, complete the following steps:
-
Navigate to the "Security Groups" service in the AWS console
-
Click "Create security group"
-
Name the first security group
tecton-emr-security-group, and give it a description (e.g. "A security group that EMR clusters created by Tecton will use to communicate internally") -
Ensure the VPC you selected in the previous step is selected here.
-
Add the following tags to the security group:
key: tecton-accessible:DEPLOYMENT_NAME
value: true

key: tecton-security-group-emr-usage
value: manager,core&task -
Click "Create Security Group"
-
Name the second security group
tecton-service-emr-security-group, and give it a description (e.g. "A security group that EMR clusters created by Tecton will use to communicate with EMR services") -
Ensure the VPC you selected in the previous step is selected here.
-
Add the following tags to the security group:
key: tecton-accessible:DEPLOYMENT_NAME
value: true

key: tecton-security-group-emr-usage
value: service-access -
Click "Create Security Group"
-
Add the following inbound rules to
tecton-emr-security-group- Allow "All TCP" from
tecton-emr-security-group - Allow "Custom TCP" on port 8443 from
tecton-service-emr-security-group
- Allow "All TCP" from
-
Add the following outbound rules to
tecton-emr-security-group- Allow "All Traffic" to destination 0.0.0.0/0
-
Add the following inbound rules to
tecton-service-emr-security-group- Allow "Custom TCP" on port 9443 from
tecton-emr-security-group
- Allow "Custom TCP" on port 9443 from
-
Add the following outbound rules to
tecton-service-emr-security-group- Allow "Custom TCP" on port 8443 to
tecton-emr-security-group
- Allow "Custom TCP" on port 8443 to
Request your Tecton Installation
Once you've completed the above setup, you're ready to request your installation! Send the following information to the Tecton team:
- Your deployment name (e.g.
mycompany-production) - The region in which you'd like Tecton deployed (e.g.
us-west-2) - The ARN and External ID of the Tecton cross-account role
(
tecton-{DEPLOYMENT_NAME}-cross-account-role) - The ARN of the Spark role (
tecton-{DEPLOYMENT_NAME}-spark-role) and the matching Instance Profile - The ARN of the EMR Manager role (
tecton-{DEPLOYMENT_NAME}-emr-manager-role)
After you send this information to Tecton, the team will deploy Tecton into your account.
Configure access for data sources
Tecton's Spark role may need to have access to your batch data sources. Follow Connecting Data Sources for data source specific configuration.