Building a CI/CD process
Introduction
Tecton's declarative interface brings Software Engineering best practices to building features. This tutorial shows how to build a production-ready CI/CD process with Tecton.
Here's what to expect:
- A step-by-step walkthrough of setting up a CI/CD pipeline with Tecton using Github Actions.
- Hands-on experience with Tecton commands within a CI/CD framework.
- Techniques for managing code changes through pull requests and automated workflows.
The goals are:
- Learn about Tecton's features within a CI/CD pipeline.
- Minimize the obstacles in the process of developing and deploying your features.
- Automate the deployment of feature changes to production environments.
High-level Tecton branching and workspace management
The success of a Tecton feature development project relies heavily on the efficiency of (CI/CD) implementation processes. These processes ensure that changes to the codebase are thoroughly tested and deployed efficiently and error-free for teams like Data Science and ML Engineering.
Tecton recommends a CI/CD process that promotes a structured approach to feature development and deployment.

1. Notebook Exploration: Modelers define and validate new Tecton components in notebooks such as Databricks, Jupyter, etc.
2. Feature Branch Validation: Work is transferred to feature branches and
validated with tecton plan.
3. Peer Review via PR: Modelers submit their work for review through PRs.
4. Pre-Production Merges: Post-review, changes merge into a pre-production
branch, like staging, where they undergo additional integration testing in a
staging Tecton workspace that mirrors production more closely. This can involve
more comprehensive data sets and more extensive testing scenarios.
5. Production Deployment: Upon successful validation in step 4, changes are
merged into the main branch and deployed to the production Tecton workspace.
Practical CI/CD workflow with Tecton
In this tutorial, we adopt a simplified CI/CD flow using temporary development branches and a single main branch to streamline the learning process and focus on practical applications within Tecton's framework.
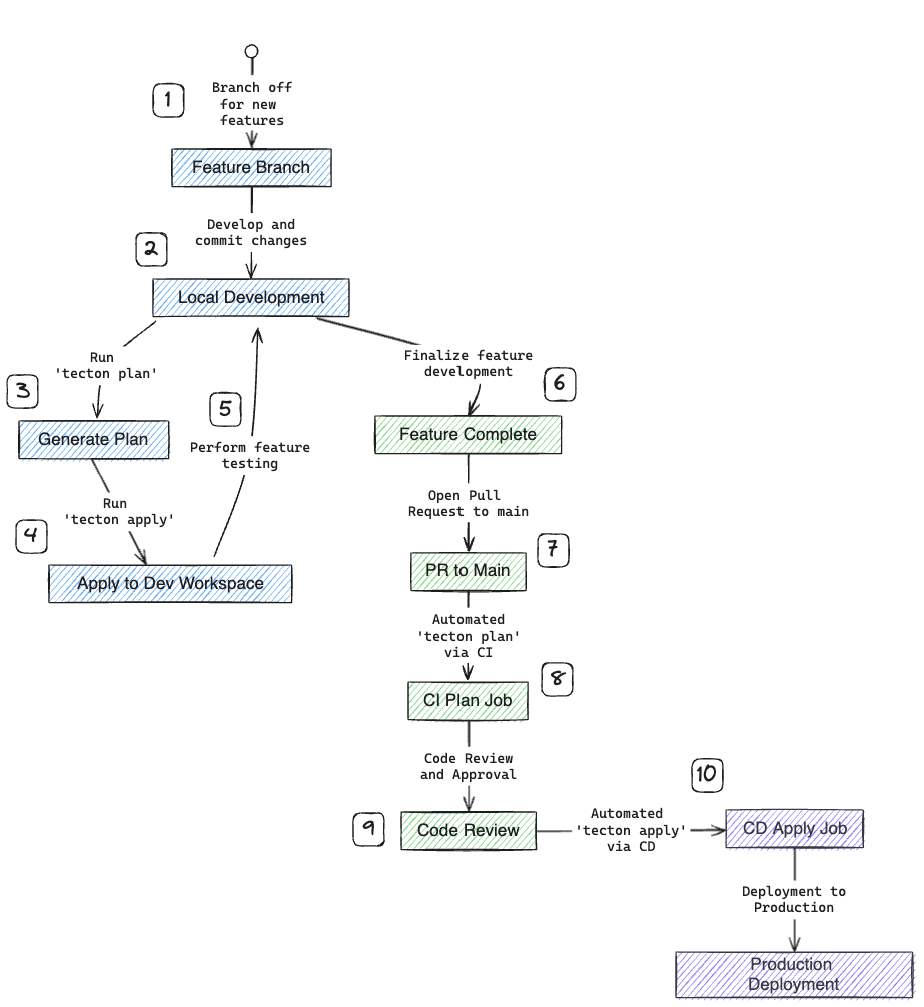
After making sure the code works well in the Notebook, we move it into our feature repository to get it ready for use by following the steps below;
- Creating and working within a feature branch.
- Developing features and committing changes locally.
- Running
tecton planand reviewing the plan for feature changes. - Executing
tecton applytoapplychanges to a development workspace. - Testing features thoroughly before deployment.
- Opening and merging pull requests to the main branch.
- Triggering automated CI/CD jobs for the
planand theapplysteps. - Reviewing and approving code changes.
- Deploying the changes to production after a successful review.
- Confirming the deployment and concluding the cycle
Prerequisites
- Tecton account
- GitHub account
- Local Tecton CLI
- Local Git
Part 1: Preliminary setup
Configuring Tecton repository and workspaces
We are using the Tecton CLI to perform the operations in this section. If you don't have Tecton CLI installed, please follow the instructions at install the Tecton CLI.
Initial setup and configuration
Login to your Tecton cluster to create a Service Account and a Workspace. We
will be using the tecton-demo.tecton.ai Tecton cluster for this tutorial.
tecton login https://tecton-demo.tecton.ai
tecton workspace create cicd-demo
Create service accounts for the cicd-demo workspace (e.g.
tecton-cicd-demo-sa). See the Tecton
documentation
if you are not familiar with Tecton User Management, Access Controls, or Service
Accounts.
tecton service-account create \\
      --name "tecton-cicd-demo-sa" \\
      --description "CICD Setup for cicd-demo workspace"
Below is an example of what the output will look like.
Save this API Key - you will not be able to get it again.
API Key:            **************
Service Account ID: 9578f14f6afa42668e84e20f32b73580
Use `tecton access-control assign-role` to assign roles to your new service account.
Write down the Account ID and API key values from the output of the above
command.
| Type | Name | Value |
|---|---|---|
| Secret | TECTON_API_KEY | API key obtained from service account creation step |
| Variable | API_SERVICE | [your-cluster-name].tecton.ai/api (e.g. tecton-demo.tecton.ai/api) |
| Variable | WORKSPACE | Name of the workspace (e.g. cicd-demo) |
Next, using Tecton CLI, assign the Editor role to your Service Account.
tecton access-control assign-role --role Editor \\
      --workspace cicd-demo \\
      --service-account <service-account-id-you-received-above>
Viewing your workspaces and service accounts via the Tecton WebUI or the command line interface is now possible.
tecton workspace list
tecton service-account list
After ensuring all workspace and service account information is correct,
initialize the local Tecton repo. tecton init creates an empty .tecton file
to set this folder as the Tecton repository root.
mkdir tecton-cicd-demo
cd tecton-cicd-demo
tecton init
GitHub Setup: Repository, branch, environments, and secrets
We must use branch and “repository and branch” protection rules to minimize the risk of unvetted code causing errors in production;
- Integrity and stability of the codebase
- Prevent direct pushes to critical branches (e.g., production)
- Require code changes to go through a review process
Creating and configuring the repository
- Log in to your GitHub account and click the
Repositoriestab. - Click on the
Newin the top right corner. - Give your repository the name
tecton-cicd-demofor this tutorial. Note: If you choose a different name for the repository, make sure to use that name in the rest of this tutorial. - Keep all the default settings and click
Create repository.
After creating the GitHub repository, go back to the local working folder you
created (i.e., tecton-cicd-demo) and synch it with the GitHub repository
you've just created.
echo "# Tecton CICD Tutorial" >> README.md
echo "**/__pycache__/" >> .gitignore
git init
git add README.md .gitignore .tecton
git commit -m "Initialized Git and Tecton local repo"
git branch -M main
git remote add origin https://github.com/gyerli-tecton/tecton-cicd-demo.git
git push -u origin main
Setting up the main branch and protection rules
By default, GitHub creates a "main" branch when you create a new repo. You can
rename this branch to prod to align it with "Production". For simplicity, we
will keep the branch name as main.
- Click "Settings" on the top horizontal menu
- Click "Branches" on the left navigation menu
- Click "Add branch protection rule"
- Type
mainin the "Branch name pattern" box - Select the below checkboxes (we will explain each of these rules in the coming
sections)
- "Require a pull request before merging"
- "Require approvals"
- "Require status checks to pass before merging"
- "Require branches to be up to date before merging"
- "Require linear history"
- Scroll down to the bottom of the page and click "Create"
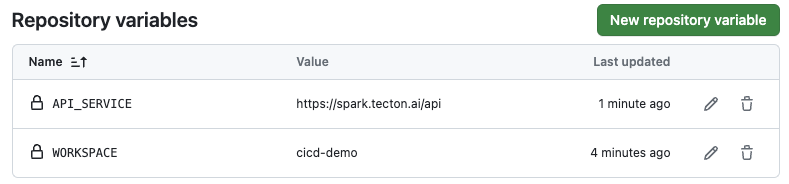
Set up repo secrets and variables
We need to add repository variables and secrets to the GitHub repository for the workflow(s) to access and interact with the Tecton repository and workspace we created earlier.
- Click "Settings" on the top horizontal menu
- In the "Security" section in the left navigation menu, Click "Secrets and Variables" and then click "Actions"
- Select the "Secrets" tab and click "New repository secret" in the "Repository secrets" box
- Type
TECTON_API_KEYin the name box and paste theAPI Keyvalue you obtained when you created a Service Accounttecton-cicd-demo-safor thecicd-demoworkspace and click "Add secret"
While still on the "Actions secrets and variables screen"
- Select the "Variables" tab and click "New repository variable" in the "Repository variables" box
- Type
WORKSPACEin the name box and typecicd-demo. This is the Tecton workspace you created - Click "Add variable"
- Add another repository variable named
API_SERVICEwith the valuehttps://<tecton-demo>.tecton.ai/api. Replace<tecton-demo>with your Tecton account name.
Your secrets and variables screen should look like below;

Part 2: GitHub workflows for Tecton CI/CD
GitHub Workflows and Actions are powerful tools that automate software development processes directly within your GitHub repository you can create CI/CD pipelines that automate the build, test, and deploy process.
GitHub workflows, when used with Tecton, automate the crucial stages of the
tecton plan and the tecton apply, which commits changes to the Tecton
feature repository, seamlessly integrating these stages into your CI/CD pipeline
for efficient and error-free management of your feature store.
Building the GitHub actions workflow to test the initial setup
Now, we'll do additional customization to the GitHub repository to make sure our
workflow has access to the Tecton workspace via API calls using TECTON_API_KEY
so that GitHub will be able to manage the Tecton workspace, allowing it to
create and modify the Tecton feature repository objects.
We are going to generate a YAML workflow file, tecton_build.yml, for GitHub
Actions which is to be parsed by GitHub and will be used to build and test
Tecton's feature platform codebase.
GitHub actions workflow file: tecton_build.yml
Open a terminal window and go to the local Tecton repo folder,
tecton-cicd-demo, we created earlier.
- Create a temporary git branch,
workflow-setup - Create
requirements.txtfile containing the list of Tecton packages that must be installed. We are installing thetectonpackage with version0.8.4. - Create
.github/workflows/folder to house our GitHub workflow files. - Create an empty file called
tecton_build.ymlin the.github/workflows/folder.
git checkout -b workflow-setup
echo "tecton~=0.8.4" >> requirements.txt
mkdir .github
mkdir .github/workflows
touch .github/workflows/tecton_build.yml
- Edit the empty
tecton_build.ymlfile in your preferred text editor, paste the following YAML configuration, and save it:
name: Tecton CICD

on:
  push:
    branches: [main]
  pull_request:
    branches: [main]

jobs:
  plan:
    runs-on: ubuntu-latest
    env:
      TECTON_API_KEY: ${{ secrets.TECTON_API_KEY }}
      API_SERVICE: ${{ vars.API_SERVICE }}
      WORKSPACE: ${{ vars.WORKSPACE }}
    steps:
      - uses: actions/checkout@v3
      - uses: actions/setup-python@v4
        with:
          python-version: "3.9"
          cache: "pip"

      - name: print variables
        run: |
          echo Running plan
          echo "dev API_SERVICE variable => $API_SERVICE"
          echo "dev WORKSPACE variable =>  $WORKSPACE"
          echo "dev TECTON_API_KEY variable =>  $TECTON_API_KEY"

      - name: Install Tecton CLI
        run: pip install -r requirements.txt

      - name: Select Tecton workspace
        run: tecton workspace select $WORKSPACE
Let's analyze important sections of the tecton_build.yml configuration file.
on: Dictates the events that will trigger the workflow. We want the workflow
will be triggered on two events:
push: When code is pushed to branches that match the patternmain.pull_request: When a pull request is made to themainbranch.
jobs: Defines a collection of jobs that will be executed.
plan: For now, there's only one job defined in this workflow. In the coming sections, we'll modify thejobssection to run thetecton planand add another job calledapplyto run thetecton apply.env: Defines environment variables for the job. In this case we specifyTECTON_API_KEY,API_SERVICE, andWORKSPACEwhich were defined in "Repository variables" and "Repository secrets" in the [[#Set up repo secrets and variables]] section.steps: Lists the sequence of operations (or "steps") that the job will execute.
Custom steps
Print variables: This step, given a name for clarity, executes shell
commands to print out the environment variables. This is useful for debugging to
ensure the correct values are being used. When printed, the TECTON_API_KEY
value will be obfuscated as it is stored in the Github repo secrets.
- name: print variables
  run: |
	echo Running plan
	echo "dev API_SERVICE variable => $API_SERVICE"
	echo "dev WORKSPACE variable =>  $WORKSPACE"
	echo "dev TECTON_API_KEY variable =>  $TECTON_API_KEY"
Install Tecton CLI: Runs a pip command to install the 0.8.4 version of
the Tecton command-line interface Python package using the requirements.txt
file we created earlier
- name: Install Tecton CLI
  run: pip install -r requirements.txt
Select Tecton workspace: This command uses the Tecton CLI to select the
appropriate workspace defined by the WORKSPACE environment variable.
- name: Select Tecton workspace
  run: tecton workspace select $WORKSPACE
Commit and upload changes to the GitHub repo
- Add all new or modified files in your current directory to the staging area, preparing them for the next commit.
- Save the changes in the staging area with a commit message, creating a snapshot of the repo's current state.
- Upload the committed changes to the remote repository to the temporary branch
workflow-setup
git add .
git commit -m "Adding requirements.txt and tecton_build.yml files"
git push -u origin workflow-setup
Pushing Changes and Triggering Tecton's CI/CD Pipeline
After you've made and committed your changes locally, you'll upload (or push)
them to the GitHub repository which starts the CI/CD process.
- Go to github and navigate to the
tecton-cicd-demorepository. - A notification should indicate a recent activity on the
workflow-setupbranch, meaning that your changes are ready for the next steps.
Create a Pull Request (PR)
- Click the "Compare & pull request" button to start comparing your changes with the main branch.
- Enter a meaningful description for the pull request, then click "Create pull request".
By doing this, we are starting the automated processes and checks defined in our
tecton_build.yml file and verifying branch protection rules for the main
branch.
on:
  push:
    branches: [main]
  pull_request:
    branches: [main]
This part of the workflow specifies that any push to the main branch or a
pull_request made against it will trigger the automated checks and processes
we have established.
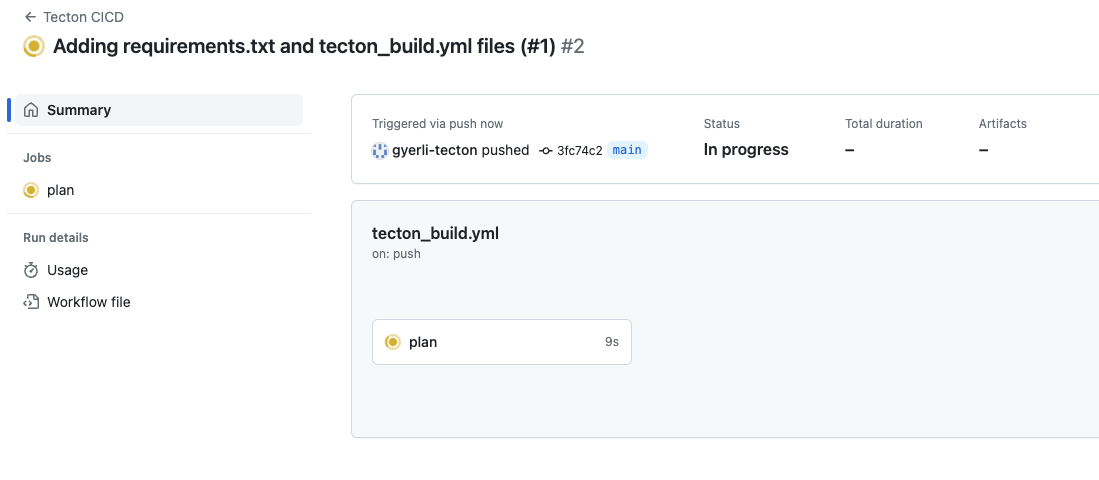
GitHub Actions Workflow Execution
After creating the PR, GitHub Actions triggers our workflow to verify the proposed changes. To see what's going on in the workflow;
- Click the "Actions" tab on the top menu bar.
- Click on the link in the workflow run box. The link text should match your
local commit message "Adding requirements.txt and
tecton_build.ymlfiles".
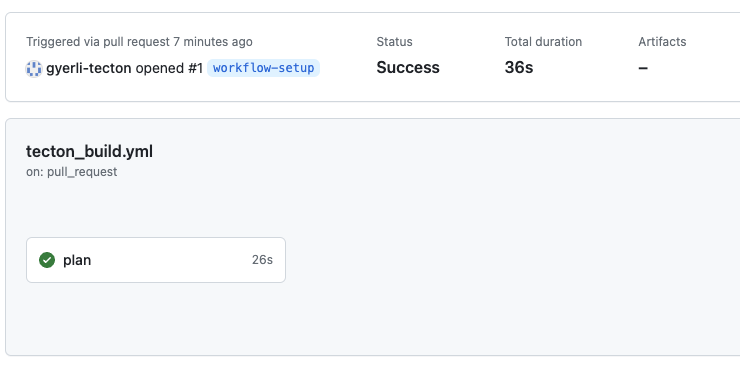
This image showcases the successful execution of the plan job within the
"Tecton CICD" workflow as defined in the repository's tecton_build.yml file.
This automated process is part of the branch protection rule "Require status checks to pass before merging", ensuring that any changes introduced do not compromise the integrity of the application before they are integrated into the main branch.
Successful Execution of Tecton Workspace Selection
During the plan execution, we instruct GitHub to make calls to Tecton API to
select a workspace (defined WORKSPACE repo variable)
- Click the "plan" box that has a green check.
- You'll see a list of steps that we defined in
tecton_build.yml - Expand "Select Tecton workspace" node
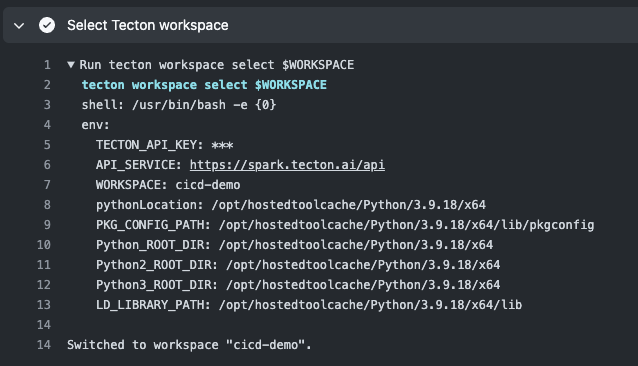
This log confirms that the GitHub Actions runner has successfully selected the Tecton workspace, indicating that the environment variables and secrets are working as expected, allowing GitHub Actions to access Tecton services.
Preparing for Merge after the Pull Request
After the successful execution of the GitHub Actions workflow, the pull request is ready for review.
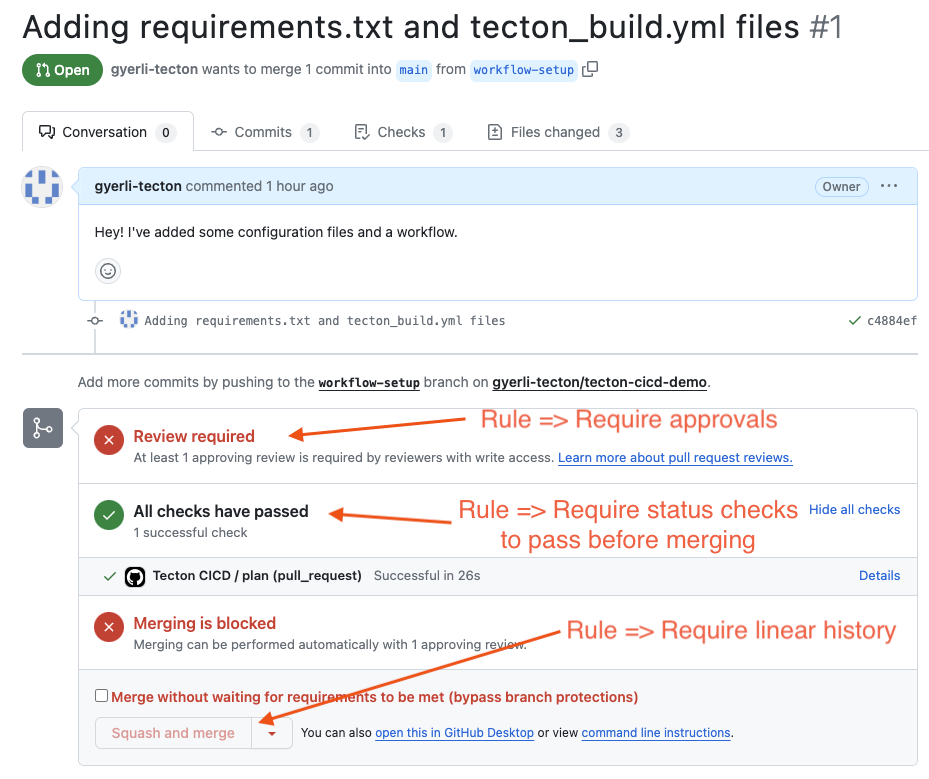
This step is governed by branch protection rules such as
- "Require approvals"
- "Require status checks to pass before merging"
- "Require linear history"
These branch protection rules maintain a high standard for the code that gets merged into the main branch.
Completing the Merge with "Squash and Merge"
For the sake of the conciseness of this tutorial, check the "Merge without waiting for requirements to be met" checkbox, but make sure to have proper approval processes, bypass rules in your production environment, and follow your organization's processes.
- Click the "Squash and Merge" button on the pull request page. This action
combines all the commits into a single commit and adds it to the
mainbranch, adhering to the "Require linear history" branch protection rule and keeping the project history clean.
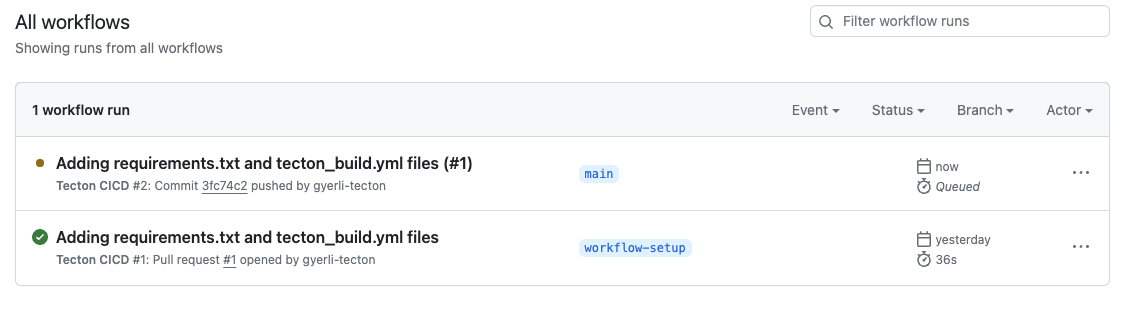
- Confirm the merge, which triggers the
planjob within the GitHub Actions workflow again, as part of the post-merge checks. This ensures that the code in themainbranch is still in a deployable state after the merge.
By performing a "Squash and Merge", the following section of the
tecton_build.yml workflow file is activated for the main branch:
on:
  push:
    branches: [main]
  # ... other triggers ...
Having successfully navigated the initial stages of our Tecton CI/CD process,
we've merged changes into the main branch and maintained a clean commit
history, and now the code has passed automated validations. At this point,
GitHub is configured to interact with the Tecton workspace,
We are at the crucial deployment phase (i.e., tecton apply) of our workflow.
Part 3: Deployment with Tecton
In this phase, we will introduce an apply job in the workflow script to run
the tecton apply command to deploy the changes to the production environment.
This is where we see the tangible results of our development efforts in the
"Live" production settings.
Pre-Deployment Configuration
Before going into deployment, we must first add a couple of more rules;
- Update our branch protection rules to safeguard the integrity of our main branch.
- Establish the
prod-applyenvironment to ensure deployments to production are reviewed and authorized.
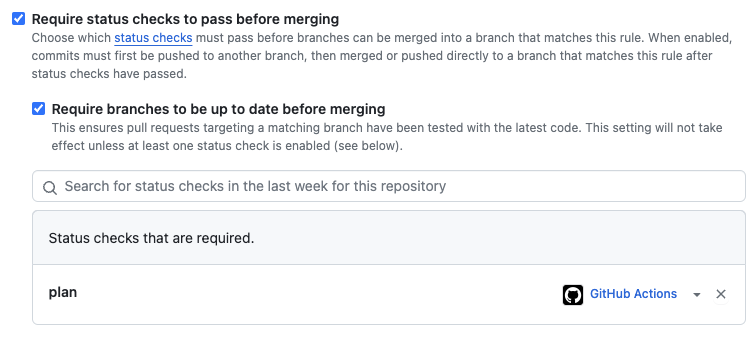
Update the main branch protection rule
- Click "Settings" on top and then "Branches" on the left navigation bar
- Click "Edit" on the
mainbranch protection rule - Ensure that "Require status checks to pass before merging" and "Require branches to be up to date before merging" are still checked.
- Under "Require branches to be up to date before merging", type "plan" in the
text box, and select "plan". This rule mandates the success of the "plan" job
(e.g.,
tecton plan) before running the deployment process (e.g.,tecton apply) - Don't forget to "Save changes"
Your main branch protection rule now looks like the screenshot below
Setting Up prod-apply Environment
We must establish the prod-apply environment to ensure deployments to
production are reviewed and authorized.
- In the repository settings, under "Environments," create
prod-apply - Require reviews for changes by adding a username in your team as a reviewer
- Disable administrator rule bypass to enforce checks uniformly.
- Click "Save protection rules"
We also must restrict deployments to the prod-apply environment to the main
branch only. While on the same screen,
- In the "Deployment branches and tags" section, select "Selected branches and tags"
- Click the "+" icon to "Add deployment branch or tag rule"
- Choose "Ref type: Branch," enter
mainin the "Name pattern" box, and then click "Add rule."
Our prod-apply environment configuration screen should look like the
screenshot below.
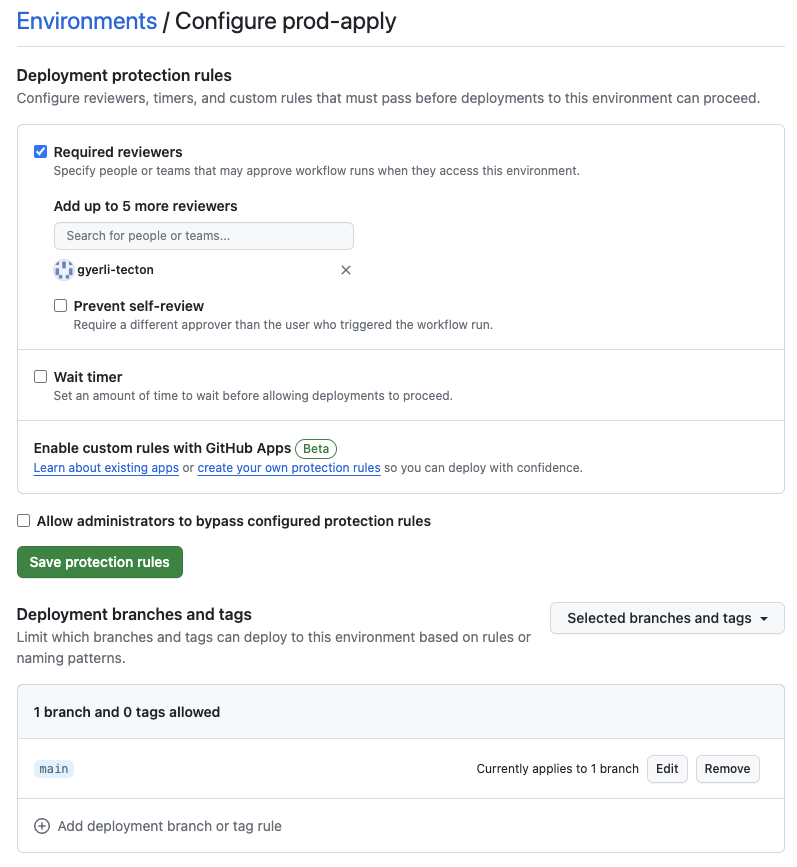
We want to make sure that every change goes through a review process and that only validated code is deployed, reflecting best practices for security and stability in CI/CD processes.
Revised GitHub actions workflow process
We are now ready to review the changes we made to our tecton_build.yml file,
which orchestrates our CI/CD pipeline. These updates are created to automate the
process from code planning to deployment so that every change pushed to our
main branch is thoroughly planned, vetted, and ready for production.
Updating the tecton_build.yml File
We've made key enhancements to our tecton_build.yml to streamline the CI/CD
process. Copy below configuration script below and paste it into your existing
.github/workflows/tecton_build.yml file. Save this file but don't push it to
GitHub yet. We'll do that in the next chapter.
name: Tecton CICD

on:
  push:
    branches: [main]
  pull_request:
    branches: [main]

jobs:
  plan:
    runs-on: ubuntu-latest
    outputs:
      planid: ${{ steps.planid.outputs.planid }}
    env:
      TECTON_API_KEY: ${{ secrets.TECTON_API_KEY }}
      API_SERVICE: ${{ vars.API_SERVICE }}
      WORKSPACE: ${{ vars.WORKSPACE }}
    steps:
      - uses: actions/checkout@v3
      - uses: actions/setup-python@v4
        with:
          python-version: "3.9"
          cache: "pip"

      - name: print variables
        run: |
          echo Running plan
          echo "dev API_SERVICE variable => $API_SERVICE"
          echo "dev WORKSPACE variable =>  $WORKSPACE"
          echo "dev TECTON_API_KEY variable =>  $TECTON_API_KEY"

      - name: Install Tecton CLI
        run: pip install -r requirements.txt

      - name: Select Tecton workspace
        run: tecton workspace select $WORKSPACE

      - name: Run Tecton plan
        run: tecton plan --json-out plan.json

      - name: Extract plan output to get the planid
        id: planid
        run: |
          PLANID=$(jq -r .plan_id < plan.json)
          echo "planid=$PLANID"
          echo "planid=$PLANID" >> $GITHUB_OUTPUT

  apply:
    needs: [plan]
    if:
      github.event_name == 'push' && github.ref == 'refs/heads/main' &&
      needs.plan.outputs.planid != ''
    runs-on: ubuntu-latest
    environment:
      name: prod-apply
    env:
      TECTON_API_KEY: ${{ secrets.PROD_API_KEY }}
      API_SERVICE: ${{ vars.API_SERVICE }}
      WORKSPACE: ${{ vars.WORKSPACE }}
    steps:
      - uses: actions/checkout@v3

      - uses: actions/setup-python@v4
        with:
          python-version: "3.9"
          cache: "pip"

      - name: print variables
        run: |
          echo Running apply
          echo "API_SERVICE variable => $API_SERVICE"
          echo "WORKSPACE variable =>  $WORKSPACE"
          echo "TECTON_API_KEY variable =>  $TECTON_API_KEY"

      - name: Install dependencies (e.g Tecton CLI)
        run: pip install -r requirements.txt

      - name: Select Tecton workspace
        run: tecton workspace select $WORKSPACE

      - name: tecton apply planid
        env:
          PLANID: ${{needs.plan.outputs.planid}}
        run: tecton apply -y --plan-id $PLANID
Let's analyze the changes we made to the tecton_build.yml file.
The plan Job Enhancements
- The
planjob is now configured to output aplanidafter a successfultecton planrun, which is crucial for the deployment process.
outputs:
planid: ${{ steps.planid.outputs.planid }}
The planid is a unique identifier for the set of changes that have been
planned and are ready for application. This ID is used by the "new" apply job
to refer to the exact changes to be deployed.
- Run Tecton Plan: Executes the
tecton plancommand, which now outputs aplan.jsonfile. This file contains the details of the planned operations to be applied to the Tecton workspace.
- name: Run Tecton plan
  run: tecton plan --json-out plan.json
- Extract Plan Output: A new step has been introduced to extract the
planidfrom theplan.jsonfile using thejqtool. Theplanidis then echoed for logging purposes and appended to the GitHub Actions output.
- name: Extract plan output to get the planid
  id: planid
  run: |
	PLANID=$(jq -r .plan_id < plan.json)
	echo "planid=$PLANID"
	echo "planid=$PLANID" >> $GITHUB_OUTPUT
Introducing the apply Job
We are introducing a new step in our workflow called "apply", which is designed
to deploy our planned changes to the production environment using tecton apply
The apply job resembles the plan job but includes a few adjustments. Here's
what happens in the apply job:
- Dependency on the
planJob: Theapplyjob needs theplanjob to be completed successfully. This ensures that we only proceed with deployment if we have a successful plan.
needs: [plan]
- Conditions for Triggering: The
applyjob runs only after a push to themainbranch if theplanidis available. This conditional trigger prevents unauthorized or accidental deployments.
if:
  github.event_name == 'push' && github.ref == 'refs/heads/main' &&
  needs.plan.outputs.planid != ''
- Environment Selection: The
environmentkeyword specifies that this job is intended for theprod-applyenvironment, signaling that we are deploying to production.
environment:
name: prod-apply
- Execution of the Tecton Apply Command: Using the
planidfrom theplanjob, thetecton applycommand is executed. This applies the changes to the production environment, completing the deployment process.
- name: tecton apply planid
  env:
	PLANID: ${{needs.plan.outputs.planid}}
  run: tecton apply -y --plan-id $PLANID
Part 4: Putting it all together: Test the CI/CD Automation with Tecton Features
Having established a solid foundation with our tecton_build.yml file and
protected our production environment with stringent rules, we are now ready to
put our CI/CD pipeline to the test.
We will create and deploy Tecton feature platform objects, such as entities, data sources, feature views, etc, to show how our automated workflow responds in a live environment.
Build a simple Tecton Feature Repository
Let's create a local Tecton repo to add our first Tecton object to show how we integrate with the CI/CD pipeline we set up in Parts 1-3.
Create a local Tecton repository
Make sure you are still in your tecton-cicd-demo directory, which we
initialized in Part 1. This directory represents your local Tecton repo.
We'll create a new branch of create-user-entity, which aligns with the best
practices discussed in Part 2, where we emphasized using feature branches in the
development process.
cd tecton-cicd-demo
git checkout -b create-user-entity
Aligning with Tecton's repository best practices, we create a set of folders, each dedicated to a specific type of Tecton object.
mkdir data_sources
mkdir entities
mkdir batch_feature_views
mkdir stream_feature_views
mkdir feature_services
Making a change to a Tecton Repository
As an example, add the file entity.py in the entities folder, which contains
an Entity object, to a local Tecton Repository:
# entity.py
from tecton import Entity
from tecton.types import Field, String

user = Entity(name="user", join_keys=[Field("user_id", String)], description="My first entity!")
Save the entity.py file, then add and commit the changes to your local Git
repository (notice that we want to include the tecton_build.yml from Part 2,
as it reflects the changes we made).
git add entities/entity.py
git add .github/workflows/tecton_build.yml
git commit -m "Adding the first Tecton object entity.py"
git push -u origin create-user-entity
Upon pushing changes to our branch, go to your GitHub repository and click the
"Compare & pull request" button to merge changes from the create-user-entity
branch into the main branch and, ultimately, deploy the changes to the Tecton
feature repository.
After creating the Pull Request, the tecton_build.yml file triggers the
defined GitHub Actions workflow. We can monitor the workflow's status by
selecting the "Actions" tab and selecting the "plan" box.
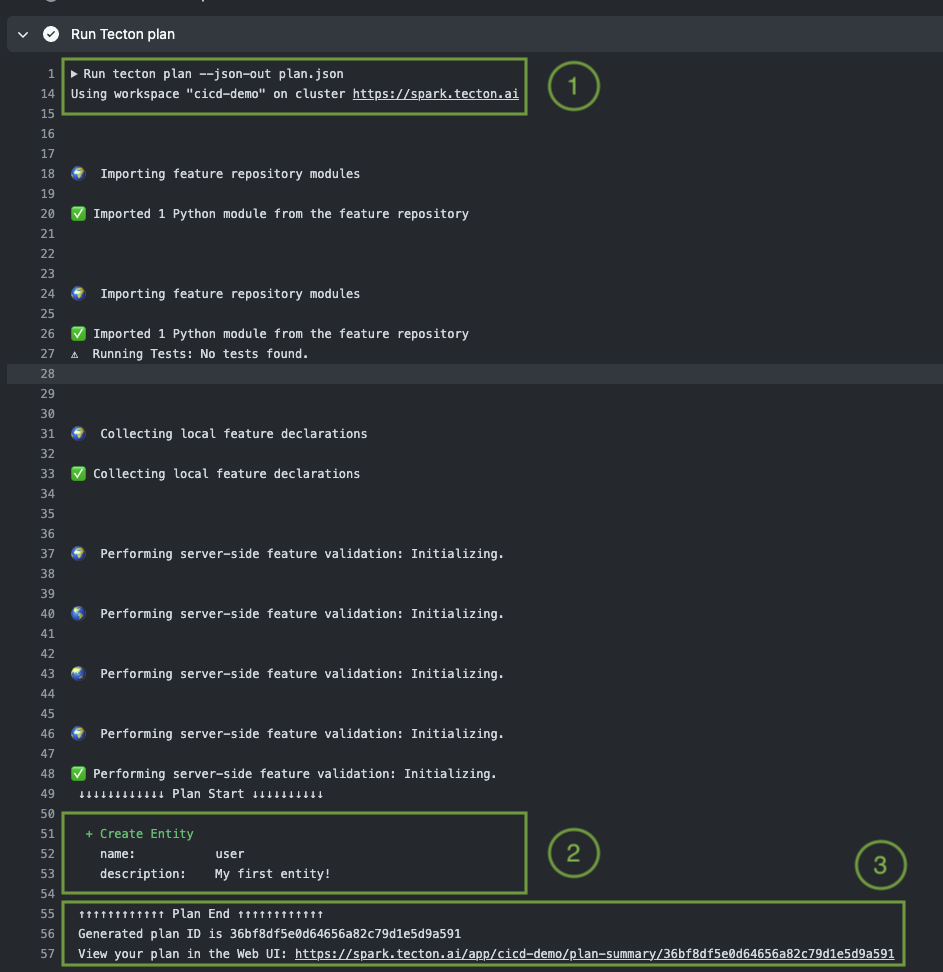
The log indicates that the "plan" job in our CI/CD pipeline executed successfully, as indicated by the output from the GitHub Actions workflow.
- Workspace Verification: The job confirms it's using the correct Tecton workspace, 'cicd-demo', and cluster URL.
- Entity Confirmation: It recognizes and plans to add the new 'user' entity
from the
entity.pyfile. - Plan Summary: The output provides a plan ID and a web link for detailed review in Tecton's Web UI.
Our workflow pipeline recognized the changes we made in the repository and is now ready for the next step, which is to implement changes in production. However, the merge process needs to be completed first.
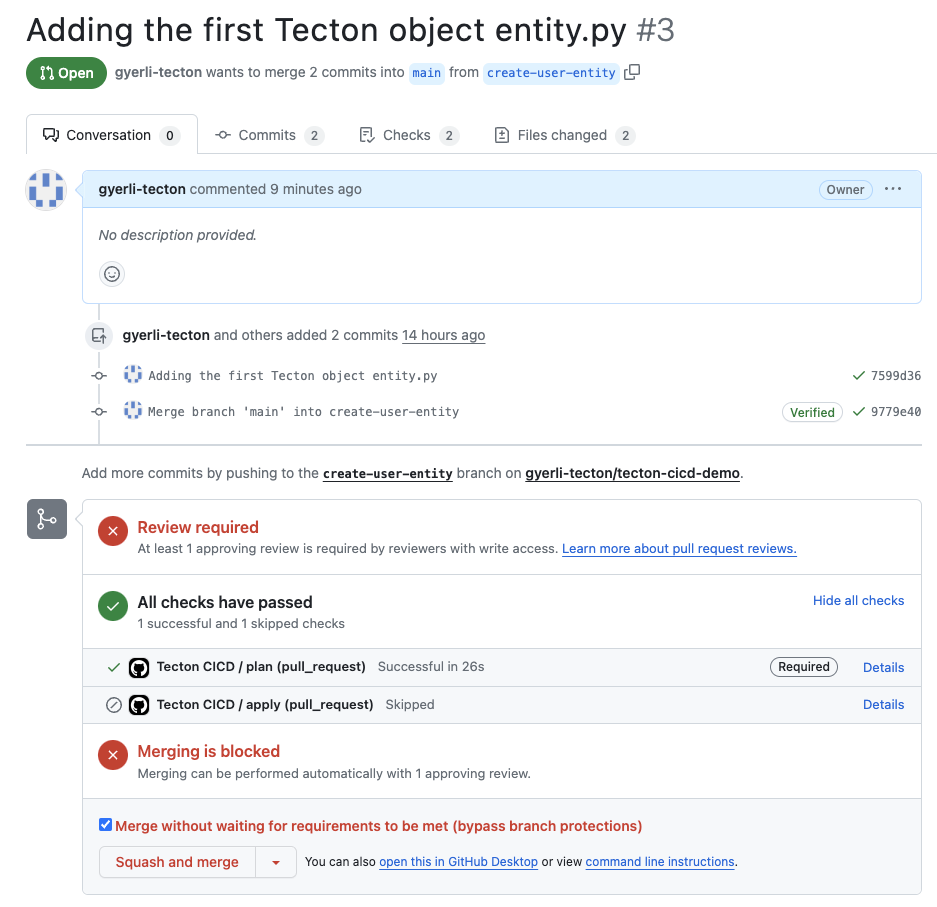
Review Required: A review is pending for the pull request "Adding the first Tecton object entity.py". As discussed in Part 2 of the tutorial, this step is vital for quality assurance.
CI/CD Status: The 'plan' job is successful, aligning with the automated checks established in Part 3.
The 'apply' job is intentionally configured to be skipped at this stage since it is designed to execute only after a merge into the main branch, ensuring changes are thoroughly reviewed and approved before deployment.
Merging Block: Per the protocol outlined in previous sections, merging is on hold until a review approves the changes. This reinforces the code review process integral to our CI/CD strategy.
Merging Actions: Upon approval, we'll proceed with "Squash and merge", a method recommended earlier for its tidy commit history.
Before you add anything to the main branch, take a good look at the changes
you've made to get ready for updating the prod environment.
Click "Squash and merge" and confirm. This will apply the changes to the main branch.
To monitor how things are going, check the "Actions" tab.

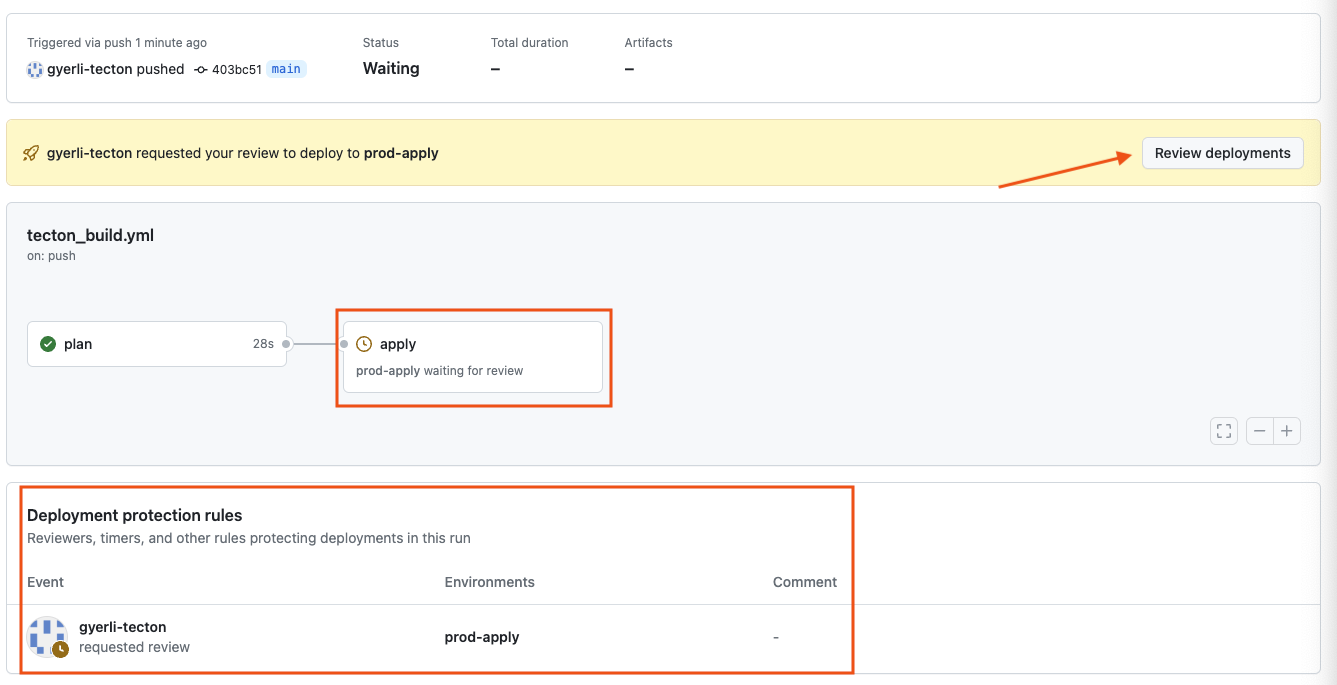
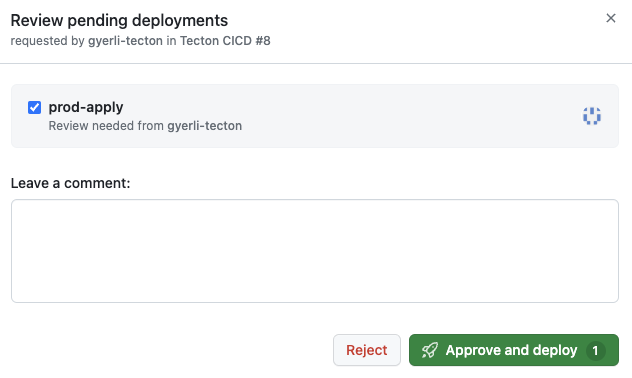
Deployment Approval: The deployment to the prod-apply environment is now
approved, initiating the final steps of the CI/CD pipeline. This follows the
review and approval procedures emphasized earlier in the tutorial.
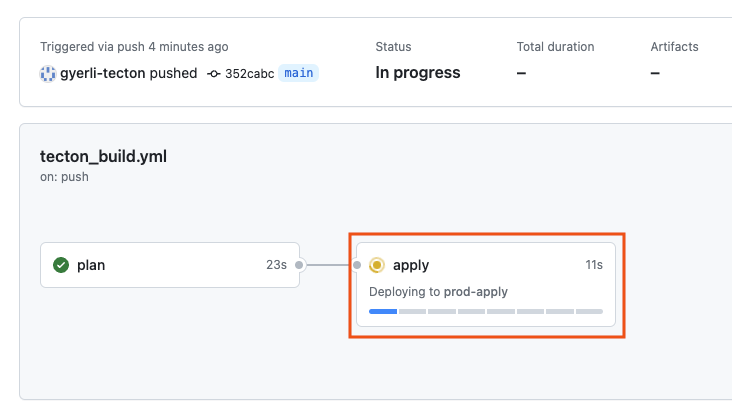
With approval granted, the 'apply' job, as defined in tecton_build.yml,
commences. This job applies the planned changes to the production environment, a
critical step in actualizing our Tecton features.
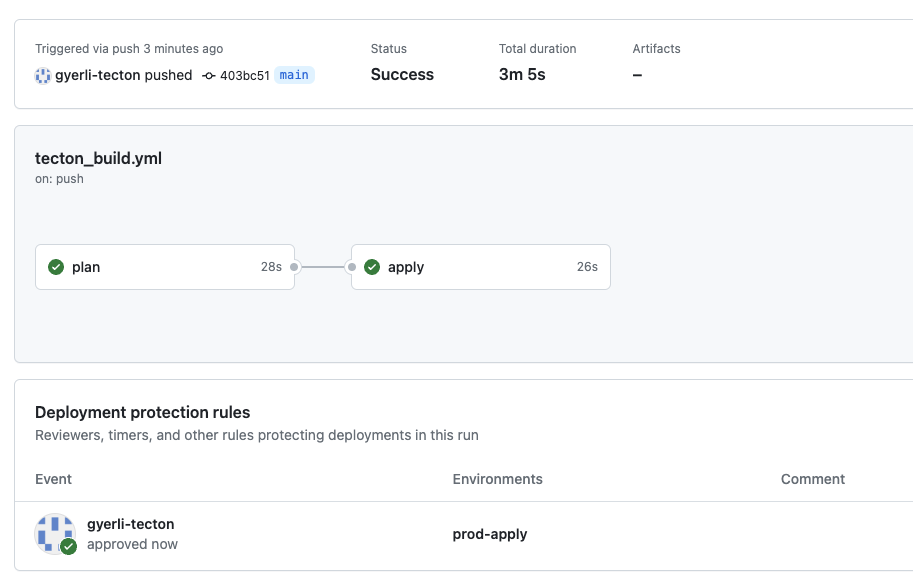
The successful execution of the 'apply' job signifies that our new Tecton entity is now live in the production feature store. This reflects the effective collaboration and rigorous validation processes detailed in the tutorial.
A final review step ensures the deployment matches our expectations. This safety check aligns with the best practices for deployment covered in the tutorial.
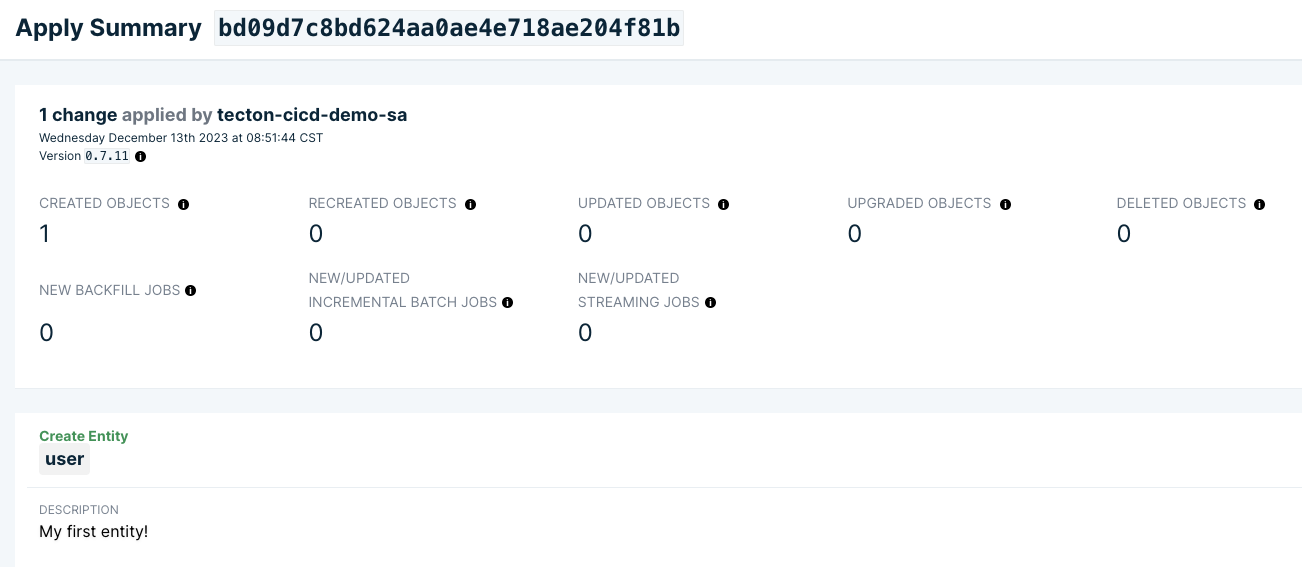
The 'apply' box with a green checkmark signifies the successful execution of the Tecton apply command within our workflow.
The log confirms a successful tecton apply operation to create the 'user'
entity, aligning with the planned changes and indicating a successful
deployment.
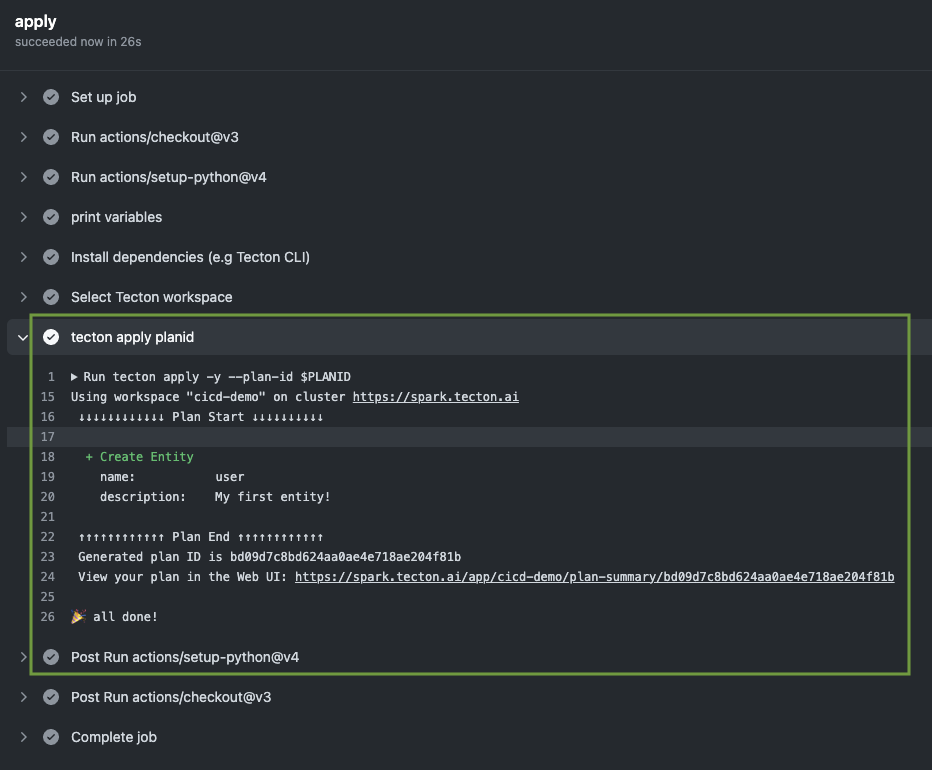
A generated URL is provided for an in-depth review of the apply job, allowing us to inspect the details and confirm that the operation matches our expectations
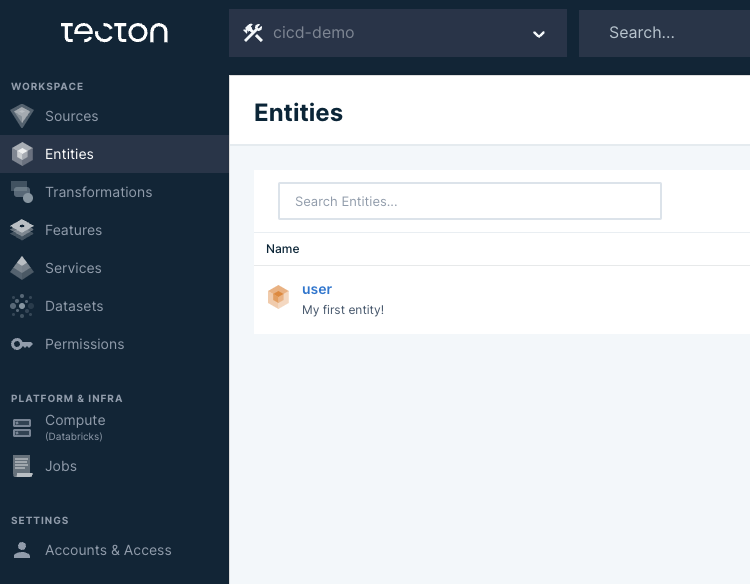
Clicking the URL takes us to the Tecton Web UI where we can see the 'user' entity now listed, verifying its presence in the Tecton feature repository.
The Tecton Web UI's 'Entities' section showing 'user' confirms the entity object is now part of the feature store, completing the deployment process.
Conclusion
We hope that you have followed and learned a practical and reliable pattern for managing the lifecycle of Tecton features. We use the patterns explained in this tutorial in our own enablement sessions because they ensure a smooth and controlled flow of features into production. It's a flexible approach that can be adapted to fit your own configuration management practices. Think of this as a trustworthy friend in your CI/CD journey - one that's recommended by us and can be tailored to become a bespoke fit for your team's needs.
Further Considerations
For future improvements, your pipeline could include a command such as
apply --suppress-recreates to leverage GitHub tags or labels for workflow
customization. This would allow for more precise deployment control, avoiding
unnecessary resource recreation when specific conditions are met. Keeping the
pipeline agile and responsive to such tailored requirements will be crucial as
we continue to refine our CI/CD strategies.