Configure Snowflake
If you are installing Tecton on Snowflake, follow these steps.
Create Tecton database objects in Snowflake
Connect to Snowflake and run the following commands.
Set the value of USER_PASS to an randomly generated password. It will be reset
on first use by Tecton.
-- Configure the names of the objects created by the following commands.
SET ROLE_NAME='<service role name>'; -- Example: TECTON_SERVICE_ROLE
SET USER_NAME='<user name>'; -- Example: TECTON_SERVICE_USER
SET USER_PASS='<randomly generated password>';
SET DATABASE_NAME='<database name>'; -- Example: TECTON

-- Create the Tecton service role
CREATE ROLE IDENTIFIER($ROLE_NAME);
-- Granting every role to SYSADMIN is recommended by Snowflake.
GRANT ROLE IDENTIFIER($ROLE_NAME) TO ROLE SYSADMIN;

-- Create the Tecton database, owned by the Tecton service role.
CREATE DATABASE IDENTIFIER($DATABASE_NAME);
GRANT OWNERSHIP ON DATABASE IDENTIFIER($DATABASE_NAME) TO ROLE IDENTIFIER($ROLE_NAME);

-- Add permissions for the Tecton service role.
GRANT USAGE ON all schemas in DATABASE IDENTIFIER($DATABASE_NAME) TO ROLE IDENTIFIER($ROLE_NAME);
GRANT USAGE ON future schemas in DATABASE IDENTIFIER($DATABASE_NAME) TO ROLE IDENTIFIER($ROLE_NAME);

-- Create the Tecton service user and grant it the Tecton service role
CREATE USER IDENTIFIER($USER_NAME)
    PASSWORD = $USER_PASS
    DEFAULT_ROLE = $ROLE_NAME
    MUST_CHANGE_PASSWORD = TRUE
    ;

GRANT ROLE IDENTIFIER($ROLE_NAME) TO USER IDENTIFIER($USER_NAME);
Request your Tecton installation
Once you've completed the above setup, you're ready to request your installation! Send the following information to the Tecton team:
- Your Snowflake account identifier.
- Your deployment name (e.g.
mycompany-production). - The region in which you'd like Tecton deployed (e.g.
us-west-2). - The values of the
USER_NAME,USER_PASSandDATABASE_NAMEvariables. - The name of the warehouse that the service role (the value of
ROLE_NAME) has access to. The service role runs materialization jobs against the warehouse. - The fully qualified name of a table Tecton can read from and use as a data source to validate your cluster setup. This table can be empty.
After you send this information to Tecton, the team will deploy Tecton into your account.
Optionally create a cross-account role for the self-managed online store
With the SaaS deployment model, you can optionally configure the online store in your own account. If you choose to do so, Tecton recommends taking this step prior to launching your first use-case to production.
You'll need to create an access policy and an IAM role which the Tecton control plane will use to orchestrate AWS resources in your account.
-
In the AWS Console of the account you want to deploy Tecton into, go to the IAM service.
-
Click the Policies tab in the sidebar.
-
Click Create Policy.
3a. Paste in the following JSON policy, replacing
${REGION}with the AWS region you selected for your deployment,${ACCOUNT}with the account ID of your AWS account,${DEPLOYMENT_NAME}with your Tecton deployment name.{
"Version": "2012-10-17",
"Statement": [
{
"Sid": "DynamoDB",
"Effect": "Allow",
"Action": [
"dynamodb:BatchGetItem",
"dynamodb:BatchWriteItem",
"dynamodb:ConditionCheckItem",
"dynamodb:CreateTable",
"dynamodb:DeleteItem",
"dynamodb:DeleteTable",
"dynamodb:DescribeTable",
"dynamodb:GetItem",
"dynamodb:PutItem",
"dynamodb:Query",
"dynamodb:TagResource",
"dynamodb:UpdateTable"
],
"Resource": [
"arn:aws:dynamodb:${REGION}:${ACCOUNT_ID}:table/tecton-${DEPLOYMENT_NAME}*"
]
},
{
"Sid": "DynamoDBGlobal",
"Effect": "Allow",
"Action": ["dynamodb:ListTables", "dynamodb:DescribeLimits"],
"Resource": "*"
},
{
"Sid": "VerifyPermissions",
"Effect": "Allow",
"Action": [
"iam:GetPolicy",
"iam:GetRole",
"iam:GetRolePolicy",
"iam:GetPolicyVersion",
"iam:ListPolicyVersions",
"iam:ListAttachedRolePolicies",
"iam:ListInstanceProfilesForRole"
],
"Resource": [
"arn:aws:iam::${ACCOUNT_ID}:policy/tecton-*",
"arn:aws:iam::${ACCOUNT_ID}:role/tecton-*"
]
}
]
}3b. Click Next: Tags
3c. Add the following tag to the policy
key: tecton-accessible:DEPLOYMENT_NAME
value: true
3d. Click Next: Review
3e. Give the policy an easy to remember name starting with
tecton-, liketecton-{DEPLOYMENT_NAME}-cross-account-policy3f. Click Create Policy
-
Click the Roles tab in the sidebar.
-
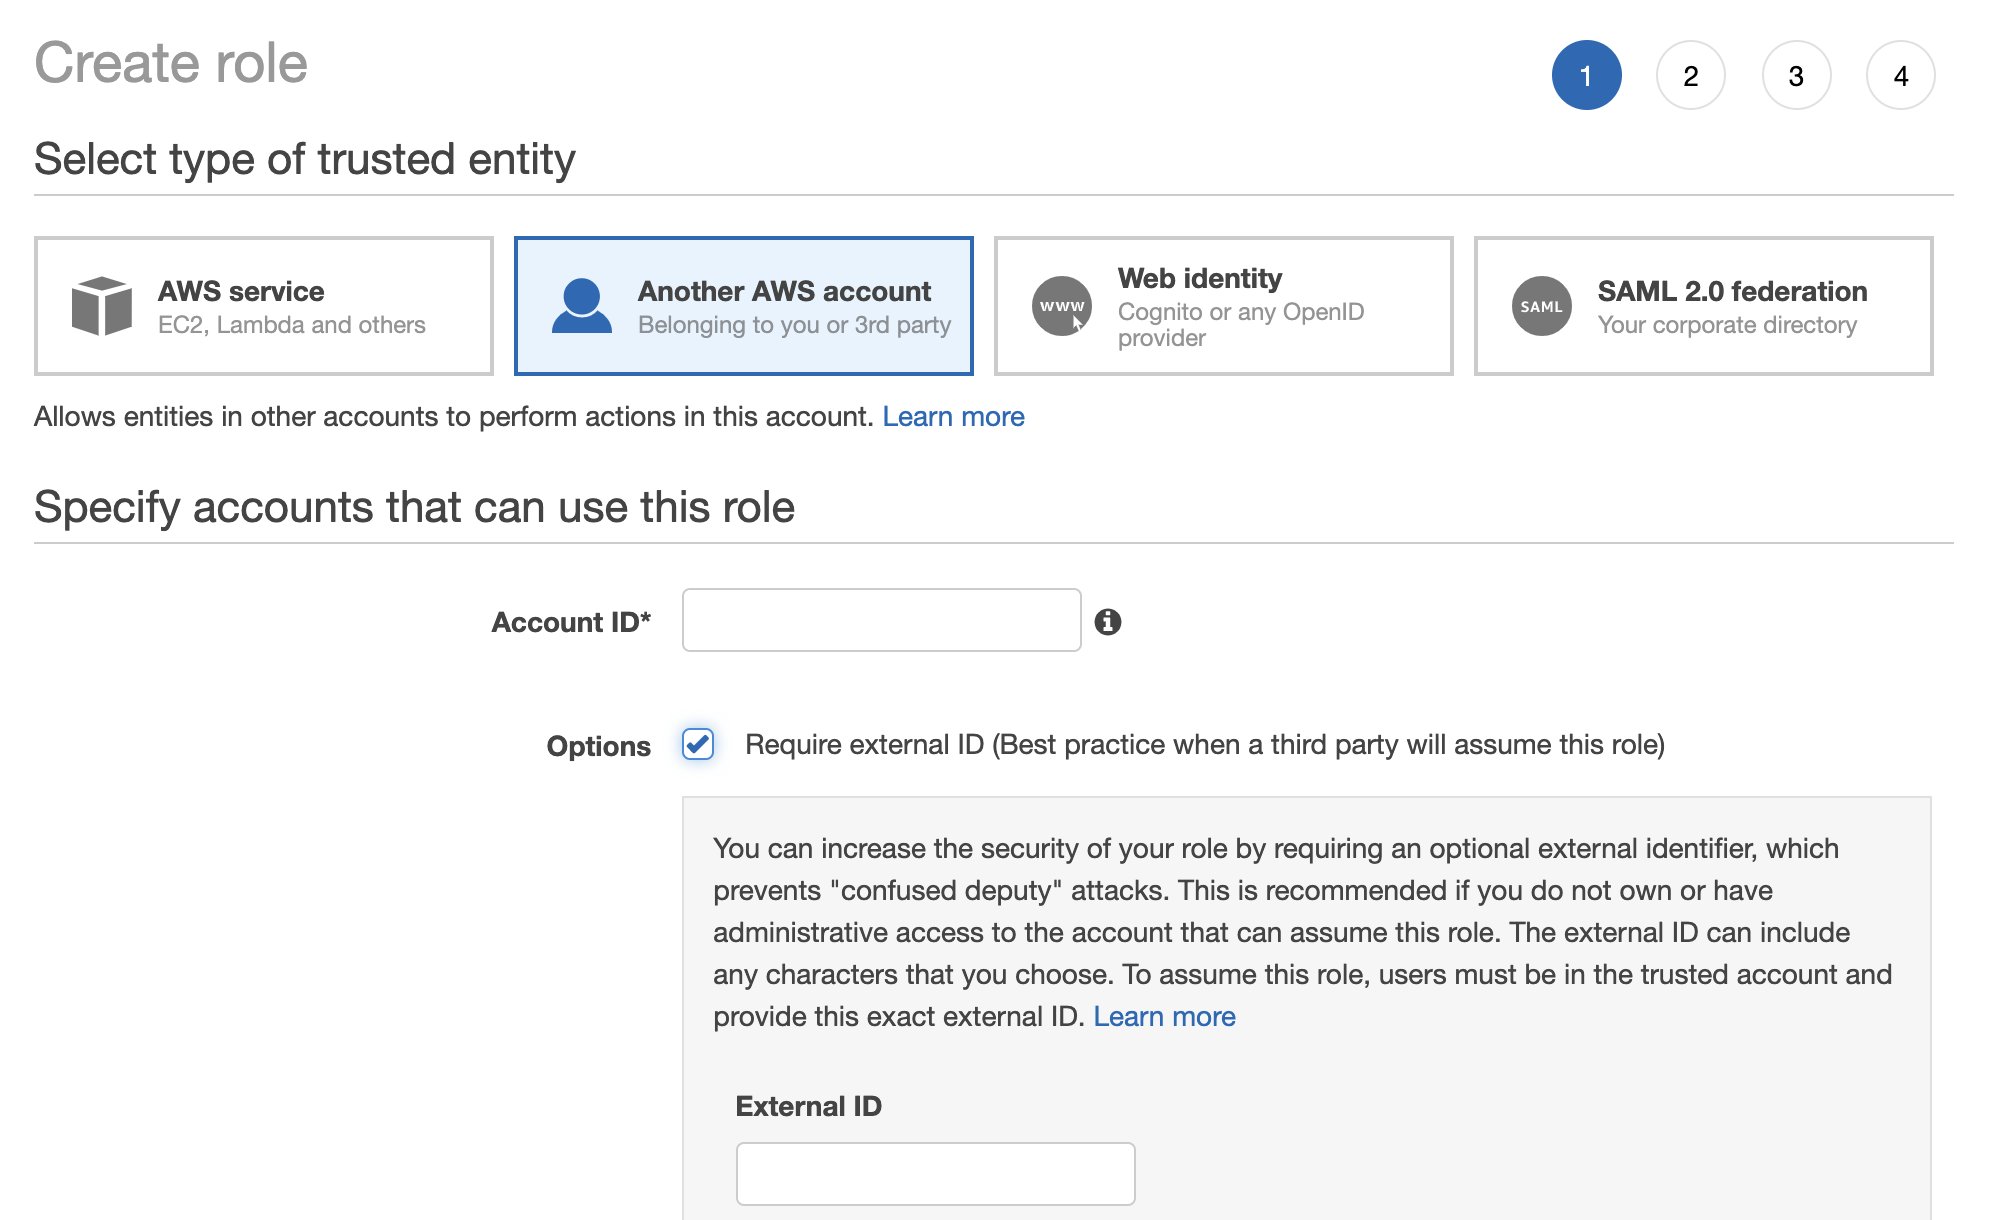
Click Create role.
5a. Under Select type of trusted entity, click the Another AWS account tile.

5b. Specify Tecton's Account ID. Please contact your Account Manager to get the appropriate ID.
5c. Enable the option "Require external ID."
5d. Enter a random External ID of your choice (for example, a UUID works well). Make sure to note down the external ID that you choose -- you'll need to provide this to Tecton to complete the installation.
5e. Click the Next: Permissions button
5f. Search for the policy you just created (e.g.
tecton-{DEPLOYMENT_NAME}-cross-account-policy), and click the check box next to that policy to attach the policy to the new role.5g. Click the Next: Tags button.
5h. Click the Next: Review button.
5i. In the Role name field, enter a role name starting with
tecton-, such astecton-{DEPLOYMENT_NAME}-cross-account-role.5j. Click Create role. You will see a list of roles displayed.
Finally, send Tecton the ARN and External ID of the role you created for the Tecton control plane.