User Management and Access Controls
Tecton access controls enable organizations to configure fine-grained governance over who and what can modify the Feature Platform and access feature data.
Access controls are configured by granting roles to principals. Most roles apply to actions that a principal can perform in a specific workspace.
Tecton Access Controls govern access to Tecton metadata and online features, but not access to offline data. See limitations.
Tecton Principals
In Tecton, access controls are used to specify what actions a principal is able to perform. A principal is a User, Service Account, or Principal Group.
Users
The User principal represents an individual who accesses an organization's Tecton Account by logging in with their own credentials to the Tecton Web UI or CLI. Users need to be configured with the appropriate Tecton access controls in order to develop with Tecton, or administer the account.
Service Accounts
The Service Account principal represents machine access to the Tecton Account, such as a training pipeline or an ML application accessing features. Service Accounts authenticate access using API keys.
Service Accounts can also support authentication using OAuth. This feature is in Public Preview.
Principal Groups
Tecton Principal Groups simplify the process of granting your Tecton users access to the appropriate resources. By organizing Tecton Users and Services Accounts into Groups, Administrators can simply make role changes at the Group level to govern their organization.
When a User or Service Account is added to a Principal Group, then they will inherit any roles that have been granted to said Principal Group. Principals that are members of multiple groups will inherit the union of roles across those groups.
Additionally, Administrators can automate Group membership configuration by using Identity Provider Attributes. Identity Provider Attributes automatically assign Users to Groups at sign-in time, based on attributes passed in from your Identity Provider during the Single Sign-On process.
Summary of roles and permissions
Workspace-level roles
The following roles can be granted in a workspace.
- Owner: Can perform any action in an existing workspace. The Owner role is automatically granted to the creator of a workspace.
- Editor: Can modify the workspace itself, but not other users' access. Also includes Operator's and Consumer's permissions.
- Consumer: Can access online data. Also includes Viewer's permissions.
- Operator: Can manage materialization and dataset generation jobs. Also includes Viewer's permissions.
- Viewer: Can view definitions and metadata.
Instance-level roles
The Admin role
Principals with the admin account type have the Admin role. The Admin role can
add/remove users, grant/revoke workspace-level roles to principals and create
live workspaces.
The Regular role
By default, all principals have the Regular principal role. This role grants basic permissions, such as the permission to create development workspaces and Service Accounts.
All-Workspace roles
Any of the workspace-level roles can optionally be granted across all workspaces, to a user, a group, or a Service Account. Doing so allows the user or Service Account to perform the actions allowed by that role, across all workspaces. The principal will automatically assume that role on all new workspaces created thereafter.
Only admins can assign an all-workspace role to a user or Service Account.
Configure Access Controls
Access controls can be configured via the access-control
CLI command,
or via Permissions or Accounts & Access in your Tecton cluster's Web UI,
located at https://<your Tecton instance prefix>.tecton.ai.
The Permissions view contains a subset of the access control settings that are available on the Accounts & Access view. See the next two sections for details.
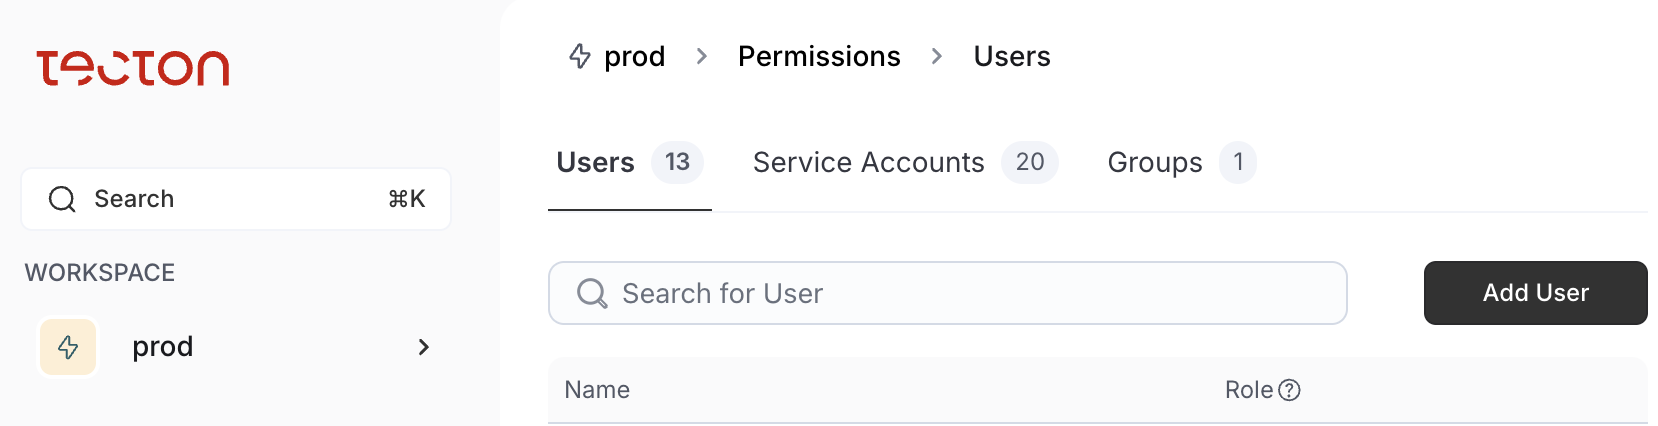
The Permissions view
The Permissions view allows you to configure access controls for a specific workspace. To access this screen, select Permissions under the Workspaces section on the left side of the Web UI. After selecting Permissions, you will see a list of all users that have access to the workspace and the workspace roles each user has been granted. You can also view a list of Service Accounts or Groups and their corresponding names and roles.
On the Permissions view, you can perform the following tasks by following the steps specified in the second column.
| Task | How to perform the task |
|---|---|
| Add a user to the workspace | Under the Users tab, click Add User to workspace. |
| Remove a user from the workspace | For the user who you want to remove, click the Edit icon on the right, then select None and click Change access. |
| Modify a user’s workspace roles | For the user for whose workspace roles want to modify, click the Edit icon on the right, then select the appropriate role and click Change access. |
| Add a Service Account to the workspace | Select the Service Accounts tab, then click Add Service Account to workspace. |
| Remove a Service Account from the workspace | For the Service Account you want to remove, click the Edit icon on the right, then select None and click Change access. |
| Modify a Service Accounts’s workspace roles | For the Service Account for whose workspace roles want to modify, click the Edit icon on the right, then select the appropriate role and click Change access. |
The Accounts & Access view
This view is accessible only to users with the Admin role.
The Accounts & Access view allows you to configure access controls for any workspace. Additionally, you can configure user access to your Tecton instance and create Service Accounts.
To access this screen, select Accounts & Access under the Workspaces section on the left side of the Web UI. After selecting Accounts & Access, you will see a list of all users who have access to your Tecton cluster. You can also view a list of Service Accounts or Groups and their corresponding information.

On the Accounts & Access view, you can perform the following tasks by following the steps specified in the second column.
User management
| Task | How to perform the task |
|---|---|
| Add a user to the Tecton cluster. | Click Invite User. |
| Remove a user from the Tecton instance. | In the Actions column, click the Delete icon. |
| Unlock a user. | On the Users tab, click on the user’s name. On the left side, in the Admin Actions section, click Unlock User. |
Service Account management
| Task | How to perform the task |
|---|---|
| Create a Service Account. | Select the Service Accounts tab, and click Create new Service Account. |
| Deactivate and delete a Service Account | In the Actions column, click Deactivate. Once deactivated, click Delete in the Actions column. |
Principal Group management
| Task | How to perform the task |
|---|---|
| Create a Principal Group | On the Groups tab, click Create Group. Enter a unique name and optionally a description. |
| Add Users or Service Accounts to a Principal Group | On the Groups tab, click on the group's name. On the right side, in the Users or Service Accounts tab, click Add User or Service Account to Group and select the members. |
| Remove Users or Service Accounts from a Principal Group | On the Groups tab, click on the group's name. On the right side, in the Users or Service Accounts tab, click the delete icon next to the principals to delete. |
| Modify IdP attributes for a Principal Group | On the Groups tab, click on the group's name. On the left side, in the Identity Provider Attributes section, click Add Attribute, or click the update or delete icons next to an existing attribute. |
Assigning and un-assigning access
| Task | How to perform the task |
|---|---|
| Show all workspaces a principal has access to, along with the roles they have been granted in each workspace. | On the Users, Service Accounts, or Groups tab, click on the principal’s name. This information is shown on the right side. |
| Add a principal to a workspace. | On the Users, Service Accounts, or Groups tab, click on the principal’s name. At the top, click Assign Workspace Access. |
| Modify a principal’s workspace roles. | On the Users, Service Accounts, or Groups tab, click on the principal’s name. On the right side, click the Edit icon on the right, then select None and click Change access. |
| Modify a principal’s account type. | On the Users, Service Accounts, or Groups tab, click on the principal’s name. On the left side, click the Edit icon next to Account Type, and select the desired account type. |
Managing Service Accounts and role assignments with the CLI
The Tecton CLI additionally provides commands for creating and managing Service Accounts, and assigning or unassigning roles.
Service Account Management
To create, modify, and delete Service Accounts, use the tecton service-account
command. Run tecton service-account --help for details on how to use the
command.
Assigning and un-assigning access
To list, assign, or unassign a role from a principal, use the
tecton access-control command. Run tecton access-control --help for details
on how to use the command.
Authentication introspection
For convenience, you can also run the tecton whoami CLI command to inspect
what principal is being used to authenticate the CLI.
User management using an identity provider
If you use an identity provider with Tecton (i.e. have SSO configured), just-in-time (JIT) provisioning occurs; the first time a user signs in to Tecton, a user account is created and the account appears on the Accounts & Access screen. If the user already had a Tecton account with the same email, signin via SSO signs the user in as the existing user. Each time the user signs in via their identity provider, the user's first and last name are also updated.
If a user is removed from your identity provider, the user account will still exist in Tecton, although that user will not be able to sign in, as they will be denied access by your identity provider. To completely remove the user from Tecton, delete the user from the Accounts & Access screen.
Tecton supports SSO using either SAML 2.0 or OpenID Connect (OIDC). Tecton is the Service Provider.
SSO with SAML
Tecton supports SSO with SAML 2.0. All common/standard Identity Providers that implement SAML 2.0 are supported. The standard set up supports:
- Service provider initiated (sp-initiated) SSO
- Identity provider initiated (idp-initiated) SSO
- Just in time (JIT) provisioning
- Request & response signing using SHA-256 signature algorithm
- Assertion Consumer Service HTTP-POST binding
- HTTP-redirect request binding
- Max clock skew of 2 minutes
- (available on request) assertion encryption
SAML uses the web browser for control flow so your identity provider can be on your corporate network as long as your users can access Tecton and your identity provider.
Configuring SSO with SAML
Single sign-on (SSO) enables your users to sign in to Tecton using your organization's Identity Provider for authentication. The process to set up SSO with SAML is:
- Reach out to your account representative or support requesting SSO with SAML.
If you have more than one Tecton instance, specify which instances you want
to enable. They will provide you with the SAML Service Provider information
for each of your Tecton instances. This includes:
- Assertion Consumer Service URL: The Sign-on URL for sp-initiated SSO.
- Entity ID: aka Audience URI
- Default RelayState: This is passed as a query parameter and is the location to redirect the user after SSO (Not all IdPs support this parameter).
- Public certificate: Used by your identity provider to verify the signature of sign-in requests were created by Tecton.
- Create a SAML application for each Tecton instance in your Identity Provider
using the provided configuration. Configure the SAML assertion's NameID to be
the user's email. Also include claims for
email,firstName,lastName, and optionallygroupswith these names. If unable to use these names, let us know the names for these claims. See below for examples of this with common identity providers. - Provide support the metadata for your identity provider (your identity
provider may provide an option to export a xml file with this information).
Please include:
- Issuer: The id of your Identity Provider. Aka Entity ID.
- IdP SSO URL: The binding-specific IdP Authentication Request Protocol endpoint that receives SAML AuthnRequest messages from Tecton.
- Destination: The value of the
destinationfield in the SAML Authentication Request (often the same as the IdP SSO URL). - Certificate: The public certificate used to verify the signature of assertions signed by your IdP.
- Support will confirm when SSO is ready in Tecton, adding a "Sign in with SSO" button to the Tecton login screen. When you sign in via SSO, you should enter as your existing user (the email from the SAML is matched to your existing Tecton user's email). Sign out of Tecton and sign in via SSO to confirm SSO is working as expected.
- At this point your users can sign in via SSO or their original Tecton-managed credentials. Please let support know if you wish to prevent sign in via Tecton-managed credentials. They will prevent tecton-managed username/password authentication for your users and remove the username/password fields from the login page.
Example With Okta
Follow these instructions for setting up SSO to Tecton if you use Okta as your Identity Provider.
For this example, we'll use the following data as though it was provided by Tecton support for your Tecton instance:
- Assertion Consumer Service URL:
https://login.tecton.ai/sso/saml2/0one7ge6CRv35dSea357 - Entity ID:
https://www.okta.com/saml2/service-provider/spnlikemskcjfpmsqncs - Default RelayState:
https%3A%2F%2Fexample.tecton.ai%2Fapp - Public certificate: a file named
Tecton-example-sp.certcontaining a x.509 public certificate in PEM format.
Set up steps:
- Create the SAML application in Okta:
- From the Okta Admin page, select Applications > Applications and click "Create Application Integration" and select "SAML 2.0" and click Next.
- Name the application something like "Tecton [instance-name]" (e.g.
Tecton example-prod) and click Next. - Configure SAML
- In the SAML settings, leave the fields with their defaults except for
the following:
- Single sign-on URL (also sets the Recipient & Destination URLs too):
https://login.tecton.ai/sso/saml2/0one7ge6CRv35dSea357 - Audience URI (SP Entity ID):
https://www.okta.com/saml2/service-provider/spnlikemskcjfpmsqncs - Default RelayState:
https%3A%2F%2Fexample.tecton.ai%2Fapp - Expand the Show Advanced settings:
- in Signature Certificate, browse and import the instance's public
certificate file (
Tecton-example-sp.certin this example) - ensure Signed Requests is checked.
- in Signature Certificate, browse and import the instance's public
certificate file (
- Single sign-on URL (also sets the Recipient & Destination URLs too):
- In the Attribute Statements section, add three attributes (customize the
values to match where this data is on your user profile):
- Name:
firstName, Name format:Unspecified, Value:user.firstName - Name:
lastName, Name format:Unspecified, Value:user.lastName - Name:
email, Name format:Unspecified, Value:user.email
- Name:
- [Optional] Configure this to manage group memberships in Tecton from
your identity provider's data (see
Group management using an identity provider).
In the Group Attribute Statements section, add a groups attribute
(customize the Filter to only send a subset of the groups to Tecton that
are applicable):
- Name:
groups, Name format:Unspecified, Filter:Matches Regex:.*
- Name:
- In the SAML settings, leave the fields with their defaults except for
the following:
- Click Next and then Finish to complete the Create SAML Integration wizard.
- Assign the SAML application to the people & groups that should be able to access Tecton.
- Capture and send to Tecton, the metadata for the SAML application:
- Option 1: on the application's "Sign On" tab > Settings > SAML 2.0, copy and open the Metadata URL, download the xml file and provide this to Tecton support.
- Option 2: on the application's "Sign On" tab > Settings > SAML 2.0, expand the More details section. Copy the Sign on URL and Issuer and download the Signing Certificate. Send all three items to Tecton support.
Example with Microsoft Azure Entra ID (fka Azure AD)
Follow these instructions for setting up SSO to Tecton if you use Azure Entra ID (fka Azure AD) as your Identity Provider.
For this example, we'll use the following data as though it was provided by Tecton support for your Tecton instance:
- Assertion Consumer Service URL:
https://login.tecton.ai/sso/saml2/0one7ge6CRv35dSea357 - Entity ID:
https://www.okta.com/saml2/service-provider/spnlikemskcjfpmsqncs - Default RelayState:
https%3A%2F%2Fexample.tecton.ai%2Fapp - Public certificate: a file named
Tecton-example-sp.certcontaining a x.509 public certificate in PEM format.
Set up steps:
- Create the SAML application in Azure Entra ID:
- Search for "Enterprise applications" in Azure. Click on "New Application" and then "Create your own application".
- Name the application something like "Tecton [instance-name]" (e.g.
Tecton example-prod), select "Integrate any other application you don't find in the gallery (Non-gallery)" and click Create.
- Configure the application:
- From the application's page, under Manage, select Single sign-on. Select SAML.
- Under Basic SAML Configuration, select Edit.
- Identifier (Entity ID):
https://www.okta.com/saml2/service-provider/spnlikemskcjfpmsqncs - Reply URL (Assertion Consumer Service URL):
https://login.tecton.ai/sso/saml2/0one7ge6CRv35dSea357 - Relay State (Optional):
https%3A%2F%2Fexample.tecton.ai%2Fapp - Click Save
- Identifier (Entity ID):
- Under Attributes and Claims, select Edit.
- Click on "Unique User Identifier (Name ID)" and change the Source
Attribute to
user.mail, then click Save. - Click on the following attributes to rename them and also delete the
namespace field, then click Save after each edit:
- emailaddress -> email
- givenname -> firstName
- surname -> lastName
- Click the
...next tonameand selectDelete. - [Optional] Configure this to manage group memberships in Tecton from
your identity provider's data (see
Group management using an identity provider).
Click "Add a group claim" and configure this with the set of groups you
want sent to Tecton. Under Advanced options, Customize the name of the
group claim, setting the Name to
groups.
- Click on "Unique User Identifier (Name ID)" and change the Source
Attribute to
- [Optional] Configure the application to only use sp-initiated SSO:
- Under the SAML Certificates, select Edit.
- Check the box next to Require verification certificates
- Click "Upload certificate", select the certificate file provided by
Tecton Support (you may need to rename this to end in
.cer) and click Ok. - Click Save
- Under Basic SAML Configuration, select Edit.
- Sign on URL (Optional): Enter you Tecton instance's url: for example
https://example.tecton.ai/app - Click Save
- Sign on URL (Optional): Enter you Tecton instance's url: for example
- Under the SAML Certificates, select Edit.
- Assign users and groups to the application.
- Capture and send to Tecton, the metadata for the SAML application:
- Option 1: on the application's "Single sign-on" tab > 3. SAML Certificates, next to Federation Metadata XML, click Download and provide this to Tecton support.
- Option 2: on the application's "Single sign-on" tab:
- In the "SAML Certificates" section, next to "Certificate (Base64)" click the Download link.
- In the "Set up [application name]" section, copy the Login URL and Microsoft Entra Identifier.
- Send the three above items to Tecton support.
- Once Tecton support confirms everything is set up, you can test SSO by:
- Sign out of Tecton
- Either:
- Click the "Sign in with SSO" button & sign in via your IdP
- Or, from you IdP's Apps Dashboard (e.g. https://myapps.microsoft.com/), click the tile for your Tecton application.
Group management using an identity provider
Group memberships in Tecton can be managed by your Identity Provider. Tecton updates group memberships by matching group information provided by your Identity Provider during SAML-based single sign-on (SSO) with values configured on each group.
To have your Identity Provider manage group memberships:
- Ensure your users sign in to Tecton via single sign-on (SSO) with SAML.
- Configure your Identity Provider to include a
groupsattribute in the SAML assertion with attribute values that will be used to map to Tecton groups. Typically, this means passing through a subset of the groups defined in your Identity Provider (If using Okta, see Okta's Define group attribute statements docs for details). - Configure each group in Tecton (on the group's details page in the Accounts
& Access screen) with the
groupsattribute values that map to the group. Matching any value is sufficient to map a user to the group.
Each time a user signs in via SSO with SAML, the user's group memberships update
based upon whether the user's SAML's groups attribute values match any of a
group's identity provider groups mapping values.
- If a new match is made, the user is added to the group. For new matches or if the user was previously manually added to the group, the group membership becomes managed by identity provider groups mappings.
- If a previous match no longer exists, the user is removed from the group.
- Manually created group memberships are preserved.
Identity provider groups mapping example
Consider a company with several teams that use Tecton and each of these has a group in their Identity Provider:
- Platform
- Fraud
If they want everyone to have the Viewer role, the Platform team to have Operator and the Fraud team to have Consumer, then they could define these principal groups:
| Group Name | Role | Identity Provider Groups Mapping |
|---|---|---|
| Everyone | Viewer (on all workspaces) | Platform & Fraud |
| Operations | Operator (on all workspaces) | Platform |
| ML Engineers | Consumer (on prod workspace) | Fraud |
Now imagine some users sign-in via SSO with SAML with different group information from their Identity Provider, they would be added to the following Tecton groups:
| Person | Identity Provider groups values | Tecton group memberships |
|---|---|---|
| Alice | Platform | Everyone & Operations |
| Sienna | Fraud | Everyone & ML Engineers |
| Isabel | Platform & Fraud | Everyone, Operations & ML Engineers |
Now imagine Alice moves from the Platform team to the Fraud team. On their next
sign-in to Tecton, their group memberships would change: they would be removed
from Operations and added to ML Engineers. Group memberships would then be:
| Person | Identity Provider groups values | Tecton group memberships |
|---|---|---|
| Alice | Fraud | Everyone & ML Engineers |
| Sienna | Fraud | Everyone & ML Engineers |
| Isabel | Platform & Fraud | Everyone, Operations & ML Engineers |
Below is a snippet showing how the group information should be passed in the
SAML for a user with both the Platform & Fraud identity provider group
attribute values. Note that each value must have its own AttributeValue
tag.
<saml2:Attribute Name="groups" NameFormat="urn:oasis:names:tc:SAML:2.0:attrname-format:unspecified">
    <saml2:AttributeValue>Platform</saml2:AttributeValue>
    <saml2:AttributeValue>Fraud</saml2:AttributeValue>
</saml2:Attribute>
Best practices for configuring access controls
Use Principal Groups for managing access
Create principal groups with different access levels. For example, create an admin group for your Tecton administrators, and then grant it the admin role. Or create a group for a team of users with access granted on a set of workspaces. Grant the group a role on a new workspace, and all users in the group will inherit this role on the new workspace.
The moment a member is removed from the group, they immediately lose access to the roles and permissions they inherited from the group membership. They may still have access to the workspace via a role directly assigned to them.
Leverage your Identity Provider's data for group management
Take advantage of the groups that exist in your identity provider and map them to groups in Tecton (See: Group management using an identity provider). With Identity Provider groups mappings, group memberships can be setup for new users OOTB so they have the access then need on first-login to Tecton. By leveraging your Identity Provider for group membership changes in Tecton, your existing internal controls for access grants can be followed.
Use caution when granting Owner or Editor role to live workspaces
A principal with Owner or Editor roles can take actions in a workspace that can
impact a production system. For example, running tecton apply on a workspace
causes the workspace objects that were modified or removed to be deleted and
replaced with the objects that are being applied.
Typically the Editor role will only be granted to the Service Account used for CI/CD, as well as a limited number of team members in case there is a need to apply directly.
Users and service accounts who do not need to tecton apply should be granted
either the Viewer role, to view the workspace and metadata, or the Operator
role, to also manage materialization and dataset generation jobs.
Use development workspaces for feature development
Feature development should be done in development workspaces. The developer should verify the transformation logic works as intended before promoting the feature to a production workspace.
Setting SDK credentials in a notebook
When developing features in a notebook, there are several different ways to authenticate to a Tecton instance:
- For Databricks notebooks
- For EMR notebooks
Limitations
Offline materialized feature access depends on AWS or Snowflake roles
Accessing offline materialized feature data with the Tecton SDK depends on both Tecton and underlying storage permissions. Accessing feature data without the Tecton SDK can be done with only permissions to the underlying feature storage.
The principal must have at least the Viewer role on the relevant workspace to
run commands that access offline materialized data, such as
FeatureService.get_features_for_events(). To restrict a user's offline
materialized data access to specific workspaces, see
configuring offline store access per workspace.
For Tecton on Databricks or EMR, access to offline feature data depends on the instance profile for the notebook cluster having access to the Tecton S3 bucket created during deployment.
Workspace objects, such as data sources and feature views, cannot be shared between workspaces
If you set up separate workspaces for different teams, they will not be able to share objects in these workspaces. You can however use the same object definitions in multiple workspaces.
Complete list of permissions for each role
Workspace permissions
These roles are configured per workspace, or across all workspaces.
| Permission | Owner role | Editor role | Consumer role | Operator role | Viewer role |
|---|---|---|---|---|---|
| View workspace objects (such as data sources and feature views) and health status of the workspace | x | x | x | x | x |
| Interact with workspace objects in SDK | x | x | x | x | x |
| Request online features* | x | x | x | ||
| Delete workspace | x | ||||
| Run tecton plan | x | x | x | x | x |
| Run tecton apply | x | x | |||
| Run tecton apply --suppress-recreates | x | ||||
| Run tecton restore | x | x | x | x | x |
| Create and delete datasets | x | x | |||
| FeatureTable.ingest() | x | x | |||
| FeatureView.delete_keys() | x | x | |||
| Cancel/retry/overwrite materialization jobs | x | x | x | ||
| Manually trigger materialization jobs | x | x | x | ||
| Write data to Ingest API | x | x |
* Role changes may take up to a minute to propagate to the GetFeatures API.
Platform management permissions
| Permission | Admin role | Regular role |
|---|---|---|
| Create live workspace | x | |
| Create dev workspace | x | x |
| Invite users (create, delete, resend) | x | |
| View all users | x | x |
| Remove user from account | x | |
| Create a Service Account | x | x |
| Modify Service Account metadata | x | x* |
| Deactivate or Delete a Service Account | x | x* |
| Rotate a Service Account's OAuth client secrets | x | x* |
| Create or update a Principal Group | x | |
| Delete a Principal Group | x | |
| Edit IdP attributes for a Principal Group | x | |
| View IdP attributes for a Principal Group | x | |
| Add members to a Principal Group | x | |
| Modify Data Platform configuration | x | |
| Create Secret Scope | x | |
| Delete Environments | x | |
| Create Environments | x | x |
* Only if the principal created the Service Account.
Access control permissions
| Permission | Admin role | Regular role | Owner role | Editor role | Consumer role | Operator role | Viewer role |
|---|---|---|---|---|---|---|---|
| View your assignments for user-facing roles | x | x | |||||
| View account types | x | ||||||
| Modify account types | x | ||||||
| Assign/unassign All Workspaces role | x | ||||||
| View assignments of workspace-level roles | x | x* | x* | x* | x* | x* | |
| Assign/unassign workspace-level roles | x | x* |
* The role applies to a specific workspace, or across all workspaces.
Secrets access permissions
| Scope-Level Permission | Admin role | Manager role | Writer role | Reader role |
|---|---|---|---|---|
| View and edit role assignments on a secret scope | x | x | ||
| Delete a secret scope | x | |||
| Create, update, and delete secret values in a secret scope | x | x | ||
| List secret keys in a secret scope | x | x | x | |
| Read secret values in a secret scope | x | x | x |