Sync Users and Groups from your Identity Provider with SCIM
Tecton supports the System for Cross-domain Identity Management (SCIM) open standard, allowing you to control provisioning of users, service accounts, groups, group memberships and access controls from within your Identity Provider. By leveraging Tecton's SCIM API, you can manage onboarding and guarantee off-boarding through your existing processes.
This feature is currently in Private Preview.
- Must be enabled by Tecton Support.
- Available for use with Okta and custom applications.
About SCIM and Tecton's SCIM Support
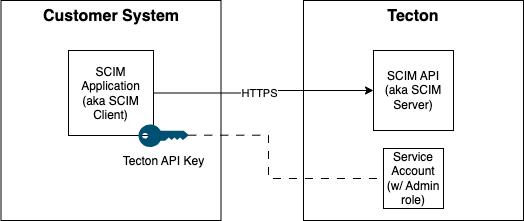
SCIM is designed to make managing user identities in cloud-based applications and services easier. Tecton supports SCIM 2.0. SCIM defines an HTTP RESTful API and schema for common resources. SCIM APIs are called by a SCIM Client (typically an Identity Provider) to provision/update/deprovision resources in the SCIM Server (typically a Service Provider - Tecton in this case). Identity Providers like Okta and Azure Entry ID have built-in support for calling SCIM APIs and can automatically sync changes to users & groups into downstream applications via their SCIM APIs. You can also build your own custom integrations and call Tecton's SCIM APIs directly.
Tecton's SCIM API supports managing:
- Users
- Groups
- Service Accounts
- Group memberships
- Role assignments
Managing Role Assignments
Managing role assignments in the SCIM APIs is optional. Contact support to disable roles management from the SCIM APIs for users, groups and/or service accounts.
Role assignments are viewable and editable directly on Users, Groups and Service
Accounts. Role assignments are expressed by two fields: a type as the
identifier for the assignment, and a value which is the role to be assigned.
- For the account type,
typeisaccount_typeand thevaluecan beadminor null. - For roles assigned over all workspaces, the type is
all_workspaces. Thevalueis any applicable role id (i.e.owner,editor,consumer,operator&viewer) or null. - For roles on a workspace,
typefollows the formatworkspace_<workspace_name>(e.g. for a workspace nameddev, it isworkspace_dev). Thevalueis any applicable role id (i.e.owner,editor,consumer,operator&viewer) or null. - For Secret Scopes,
typefollows the formatsecret_scope_<secret_scope_name>(e.g. for a secret scope namedmy_scope, it issecret_scope_my_scope). The value is any applicable role id (e.g.secret_scope_manager,secret_scope_writer&secret_scope_reader), or null.
Prerequisites
Your SCIM client (typically your Identity Provider) must have network access to connect to your Tecton account in order to call the SCIM APIs. For example, Okta does not support AWS PrivateLink, and so will not work if your Tecton account restricts traffic to AWS PrivateLink only. Contact Tecton if you would like to configure an IP Allowlist to allow traffic from your IdP (example).
Using Okta
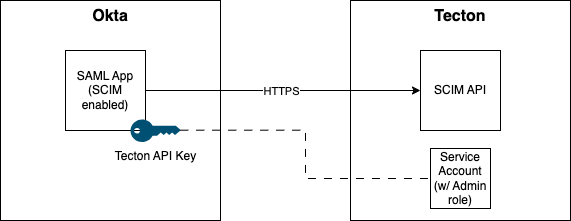
Okta can be configured to control users, groups, group memberships and role assignments in your Tecton instance(s). In your Okta organization, you'll use an SAML application with SCIM enabled to drive the integration. As changes to users, groups, etc. occur in Okta, Okta will call Tecton's SCIM APIs to sync changes to Tecton.
Okta does NOT support:
- Managing Service Accounts (Okta only supports syncing users and groups via SCIM, not applications)
- Managing Groups' description, idpMappingNames nor role assignments. Okta's Group Push Mapping only supports the Group Display Name, along with Group Membership sync (see this Okta Knowledge Base article). Because of this, you may want to have Tecton disable roles management from the SCIM APIs for groups.
For more information, please refer to Okta’s overview of SCIM and to Okta's suggested Typical workflow for adding provisioning to an existing app integration.
Configuring Okta
To set up a SCIM integration from your Okta organization to Tecton:
-
Create or have handy an API key generated from a Tecton Service Account with admin privileges. If needed, you can create a service account via either the Tecton CLI or the web UI. See this docs page for more information on how to create a Tecton Service Account.
-
Log on to Okta’s admin dashboard as a Super Administrator (or Application Administrator if you already have a SAML application for Tecton).
-
Create or use a SAML 2.0 application to use SCIM.
-
If you have an existing SAML application for Tecton, you can use it for SCIM too. Open your SAML 2.0 Tecton application in Okta under “Applications” and navigate to the “General” tab.
-
Otherwise, create a SAML 2.0 application to use SCIM with Tecton.
- See this Okta docs page to create a SAML 2.0 “custom integration” application for use with Tecton.
- If you are only using this application for SCIM, ignore the SAML settings and check the "Do not display application icon" boxes to hide the application. Otherwise, see this Tecton docs page for Tecton's SAML configuration and contact Tecton Support to connect the application to Tecton.
-
-
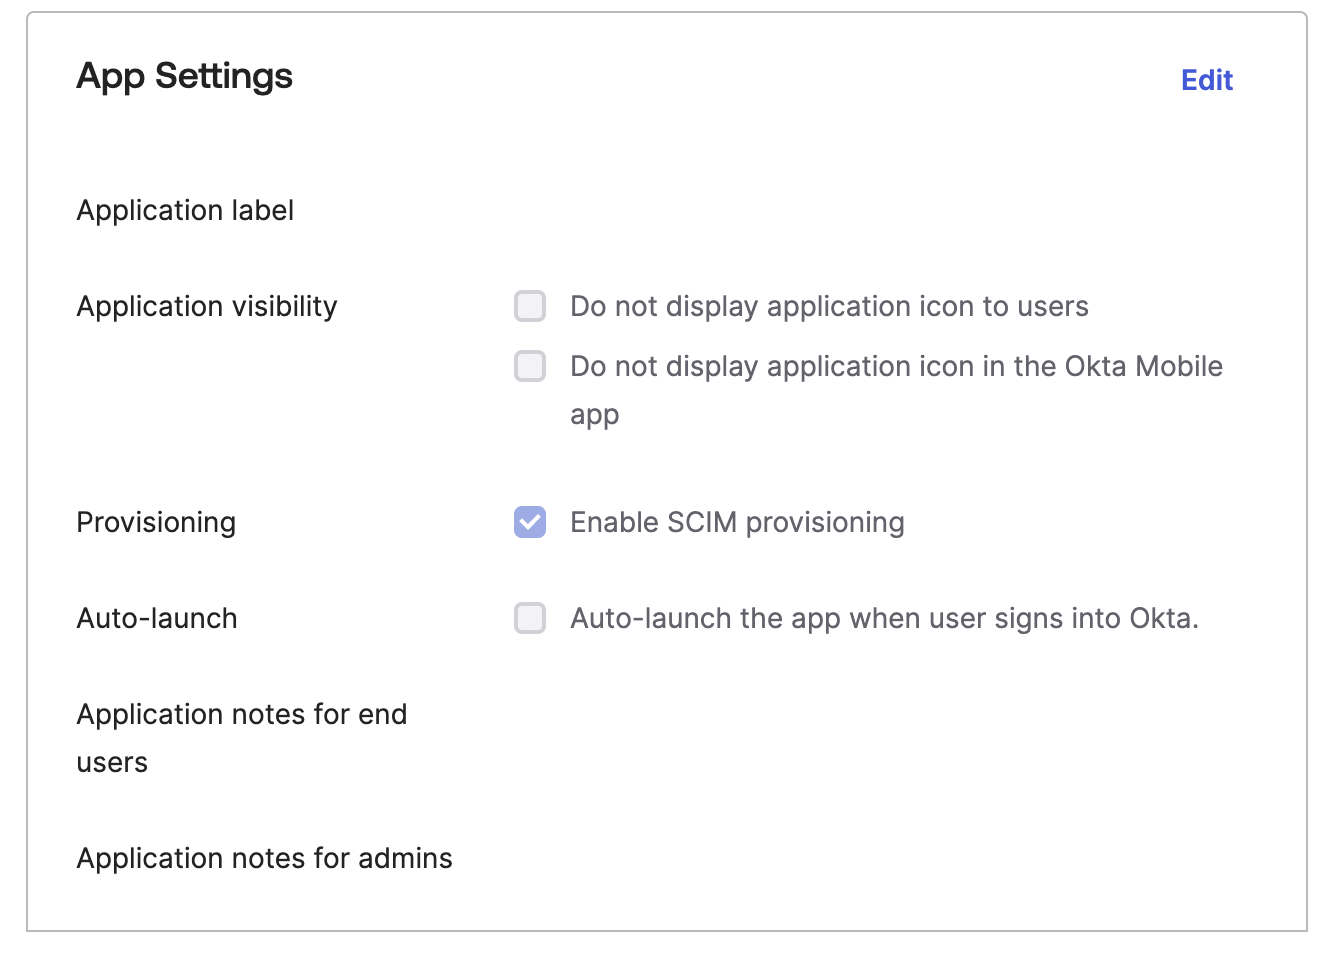
Click “Edit” in the App Settings box and click ��“Enable SCIM provisioning”.
- After enabling, you should see a new tab at the top of the application window called “Provisioning” appear.
-
Navigate to the Provisioning tab, where you should be presented with a section entitled “SCIM Connection”. Note that this corresponds to the “Integration” tab at the left hand navigation menu. Click “Edit” and fill in these options:
-
SCIM connector base URL: This should be your Tecton instance’s hostname appended with the URL path
/api/scim/v2, for examplehttps://mycompany.tecton.ai/api/scim/v2. -
Unique identifier field for users:
userName -
Supported provisioning actions: You can select the relevant options below as desired. Most customers may want to leave “Import New Users and Profile Updates” unchecked, but some may want to import Tecton Groups. Please consult this Okta docs page for more information on these options.
- NOTE: You may be presented with the error “Bad Request” when attempting
to Save the SCIM Connection if “Import Groups” is checked. This is an
Okta error due to the
SELECTIVE_APP_IMPORT_PLATFORMfeature flag not enabled. Contact your Okta account executive to enable it. In the meantime, you can select all of the options except Import Groups to continue.
- NOTE: You may be presented with the error “Bad Request” when attempting
to Save the SCIM Connection if “Import Groups” is checked. This is an
Okta error due to the
-
Authentication Mode: Select “HTTP Header”
-
HTTP Header / Token field: Enter the API key corresponding to a Tecton service account with admin privileges on this Tecton instance. Your Okta IdP will connect to your Tecton instance with this token in order to manage users and groups.

-
-
Click “Test Connector Configuration” and you should see all green checkmarks. Save this connection.
- At this point, you’ll now see three options in the Settings nav bar to the left. You can always return to the SCIM Connection settings above by clicking the “Integration” menu item.
-
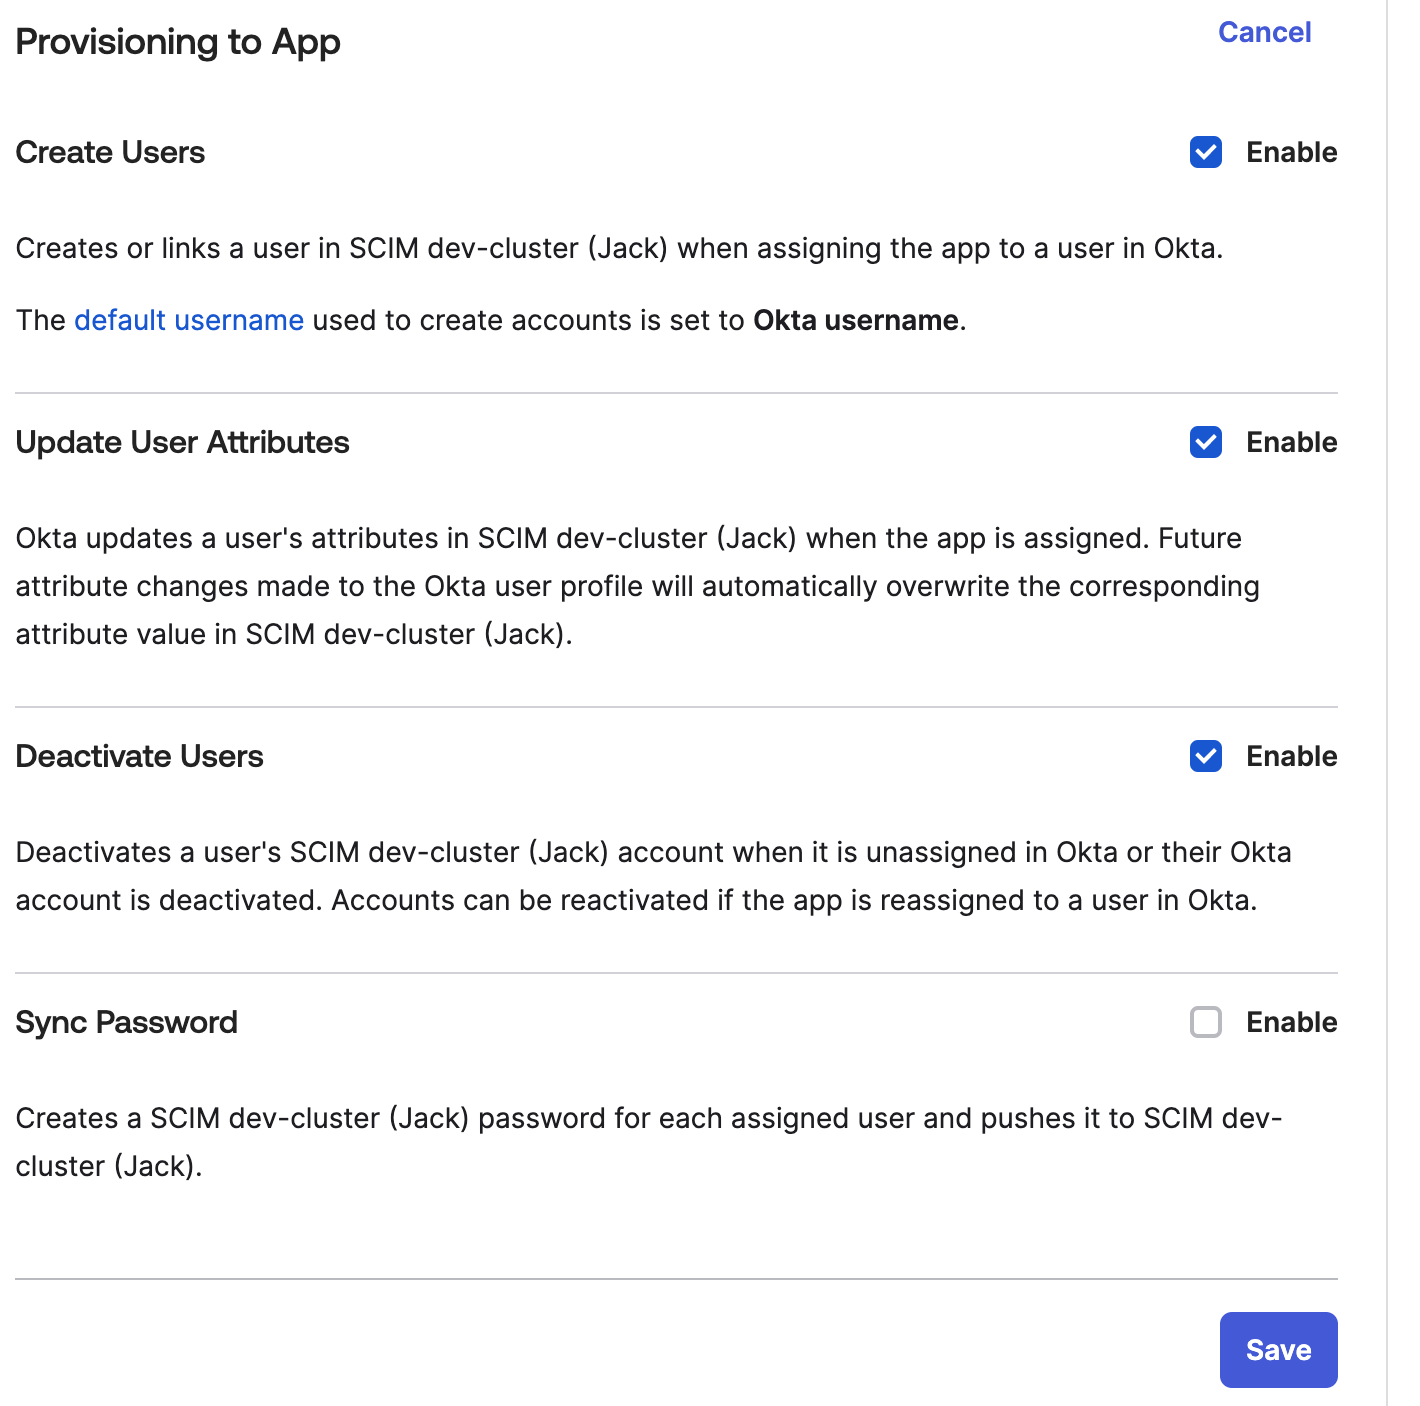
Under the Provisioning Tab “To App” section, click “Edit” in the “Provisioning to App” section.
-
Enable all options except Sync Password, i.e.: Create Users, Update User Attributes, and Deactivate Users. Click “Save”.
-
Configuring Okta for role assignments
To manage users' and/or groups' role assignments, we recommend configuring Okta as follows:
-
In Okta, use the Profile Editor to add attributes on the Application configured for SCIM with Tecton. There will be one attribute on the application for the account type, for all workspaces, for each workspace and for each secret scope.
- Go to Directory > Profile Editor, find & click the correct Application profile (search for the application you created above in Configuring Okta). Click the "Add Attribute" button for each Tecton role you wish to be able to assign.
- For the Account Type (i.e. "Admin" role), set the following properties on
the attribute and save it:
- Data type:
string. - Display name:
Account Type. - Variable name:
account_type. - External name:
roles.^[type=='account_type'].value. - External namespace:
urn:ietf:params:scim:schemas:core:2.0:User. - Description:
Tecton Account Type. - Enum: Check the box and add the following Attribute members:
- Display name:
Admin, Value:admin
- Display name:
- Attribute type: Personal
- Data type:
- For roles across all workspaces, set the following properties on the
attribute and save it:
- Data type:
string. - Display name:
All Workspaces. - Variable name:
all_workspaces. - External name:
roles.^[type=='all_workspaces'].value. - External namespace:
urn:ietf:params:scim:schemas:core:2.0:User. - Description:
Role granted over all workspaces. - Enum: Check the box and add the following Attribute members:
- Display name:
Owner, Value:owner - Display name:
Editor, Value:editor - Display name:
Consumer, Value:consumer - Display name:
Operator, Value:operator - Display name:
Viewer, Value:viewer
- Display name:
- Attribute type: Personal
- Data type:
- For roles specific to a single workspace, for each workspace, create an
attribute with the following properties and save it (replace
<workspace_name>with the actual name of the workspace):- Data type:
string. - Display name:
Workspace <workspace_name>(e.g.Workspace prod). - Variable name:
workspace_<workspace_name>(e.g.workspace_prod). - External name:
roles.^[type=='workspace_<workspace_name>'].value(e.g.roles.^[type=='workspace_prod'].value). - External namespace:
urn:ietf:params:scim:schemas:core:2.0:User. - Description:
Role granted on <workspace_name> workspace(e.g.Role granted on prod workspace). - Enum: Check the box and add the following Attribute members:
- Display name:
Owner, Value:owner - Display name:
Editor, Value:editor - Display name:
Consumer, Value:consumer - Display name:
Operator, Value:operator - Display name:
Viewer, Value:viewer
- Display name:
- Attribute type: Personal
- Data type:
- For roles specific to a secret scope, for each secret scope, create an
attribute with the following properties and save it (replace
<secret_scope>with the actual name of the secret scope):- Data type:
string. - Display name:
Secret Scope <secret_scope>(e.g.Secret Scope snowflake_test). - Variable name:
secret_scope_<secret_scope>(e.g.secret_scope_snowflake_test). - External name:
roles.^[type=='secret_scope_<secret_scope>'].value(e.g.roles.^[type=='secret_scope_snowflake_test'].value). - External namespace:
urn:ietf:params:scim:schemas:core:2.0:User. - Description:
Role granted on <secret_scope> secret scope(e.g.Role granted on snowflake_test secret scope). - Enum: Check the box and add the following Attribute members:
- Display name:
Manager, Value:secret_scope_manager - Display name:
Writer, Value:secret_scope_writer - Display name:
Reader, Value:secret_scope_reader
- Display name:
- Attribute type: Personal
- Data type:
-
[Optional] Use Okta expressions to assign roles based upon Okta information like group memberships or user or group attributes.
- Go to Directory > Profile Editor, find & click the correct Application profile (search for the application you created above in Configuring Okta). Click the "Mappings" button and then click on the tab for "Okta User to <application name>".
- For the
account_type,all_workspaces,workspace_<workspace_name>, etc, attributes on the application, enter an expression in theOkta User User Profilecolumn. See the Okta Expression Language Overview for more suggestions/examples. Below are some examples to get you started:- Set
account_typeto the following to have members of theTecton AdminsOkta group have theadminaccount type in Tecton:isMemberOfGroupName("Tecton Admins") ? "Admin" : null - Set
all_workspacesto the following to have members of theML OpsOkta group have the owner role for all workspaces in Tecton, otherwise grant them viewer access:isMemberOfGroupName("ML Ops") ? "Owner" : "Viewer"
- Set
-
[Optional] Set roles on individual users and/or groups by editing the User/Group Assignment to the application.
- Open your SAML 2.0 Tecton application in Okta under “Applications” and navigate to the “Assignments” tab.
- Click the Edit icon next to the user or group.
- Find the attribute for the role assignment you want to edit for the
User/Group and select the new role from the drop-down. Select
Not Mappedto remove the role assignment. - Click the Save button.
-
Verify: Ensure the user is assigned the application and provisioning is enabled. Their roles in Tecton will be updated based upon the above attributes, attribute mapping and SCIM provisioning.
Provisioning and Syncing
-
Import: You can now navigate to the “Import” tab at the top of the Application, and click “Import Now”. This will import all users and their profiles from your Tecton instance into your Okta IdP if they haven’t already been imported. If you’ve enabled “Import Groups”, it will also import any Tecton groups that were created on the instance.
-
Assignments: Here you can assign users and groups as normal with applications. You probably have this set up with your existing Tecton application, and you can make any changes necessary here as needed.
-
Push Groups: The “Push Groups” tab also appears when you enable SCIM provisioning. With Push Groups, you can push your Okta groups assigned to your Tecton application to Tecton, including group membership information. If you’ve already assigned permissions to the group inside Tecton, any members of the group will receive that groups’ permissions, in addition to permissions they may have been assigned manually or via other groups they are members of. See this Okta docs page for more information on Push Groups and its options.
-
Click the Push Groups button at the top of this tab, and click for example “Find groups by name” where you can manually enter groups to be pushed to Tecton.
-
Select either “Create Group” if the group does not exist in Tecton, or “Link Group” if it does and enter the corresponding group name inside Tecton.
-
HTTP API Reference
Tecton's SCIM HTTP API Reference can be found here
Limitations
SCIM defines an optional PATCH method on resources that Tecton does not implement. Some identity providers (e.g. Azure Entry ID) use PATCH instead of PUT for updates of users/groups and therefore these SCIM Clients will not be able to sync updates.
FAQ
How do SSO & SCIM differ?
SSO and SCIM tackle different problems (with some overlap) and usually go hand-in-hand. Single Sign-on (SSO) is used to authenticate users, delegating authentication from the application to the user's Identity Provider. SCIM is used for managing identities in applications and services and allows for delegating provisioning/deprovisioning to an Identity Provider. While SSO supports just-in-time provisioning to create a new user in an application on first sign-in, SCIM allows the provisioning to happen earlier, when the user is assigned the application. SCIM also supports deprovisioning, while SSO does not.